 A.S.I.A. screen configuration
The following shows configuration element
names, functions and how to operate screens in A.S.I.A.
 Login
screen
When A.S.I.A. starts up, the following login
screen is displayed. Enter the "Company
code," "Operator ID" and "Password" and select the
language used from "Language."
Next, select the function screen using the button on the left side. If the entered information is correct,
the function screen will start.
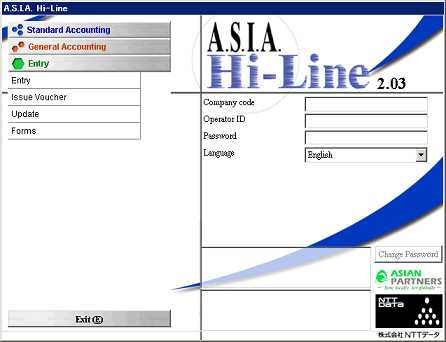
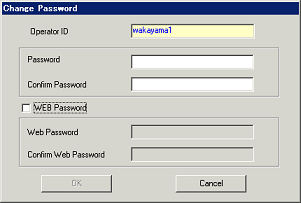
It is possible to change the login password in
[Change Password] screen displayed
by clicking on the "Change password" button.
 Function
screen
When login is successful, the function screen
is displayed. Select a process
from the "Menu" button on this screen and the processes screen will be
displayed. Also, it is possible to
start other function screens directly using the selection buttons on the left side
of the screen.
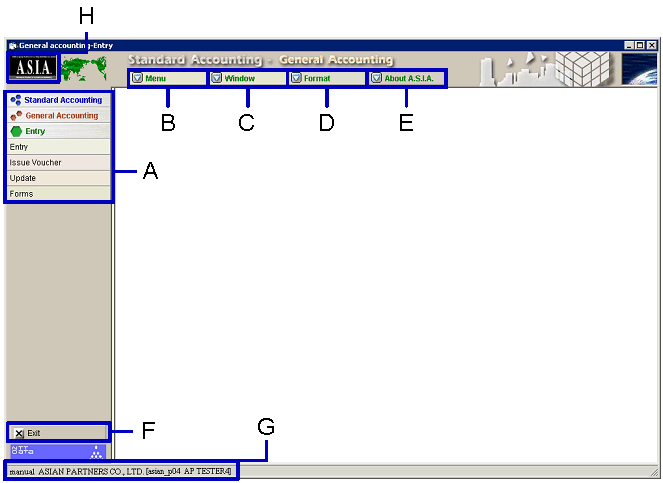
- System/module/function button
When selecting systems, modules and functions from the list, the function
window is displayed.
- "Menu" button
When this button is clicked, the menu list that can
be used in the function that is operating is displayed. Select and click a menu and the process
screen is displayed in the window.
- "Window" button
When more than one process screen is operating,
this is used to make the window easy to see. When this button is clicked, the menus are displayed in the following
menus.
-
Cascade
The operating process screens are displayed cascading.
-
Tile horizontally
The operating process screens are displayed horizontally.
-
Tile vertically
The operating process screens are displayed vertically.
- "Format" button
This button is used to adjust the format when there
is a spread sheet (tabular form) on the process screen. When this button is clicked, the
following menus are displayed.
-
Equalizing column
The widths are adjusted to the same length and are displayed.
-
Auto-adjusting column
The column width is adjusted automatically to display all entered characters and
amounts.
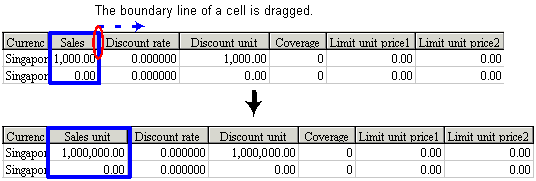
Note:
When the "Auto-adjusting column" is selected
and the amount is entered in the spread part, please be careful about the cell
width.
When the "Auto-adjusting column" is selected, the cell width is adjusted
automatically according to the entered characters and numbers. It may not be possible to enter
characters and numbers more than are already entered.
The following example displays the case when
only 3 digits in front of the decimal can be entered and 4 digits after the
decimal can be entered.
So, in this case, drag the cell border to the right to make the width wider and
enter the amount.
- "About A.S.I.A." button
A.S.I.A. version information is displayed.
- "Exit" button
This button closes the operating function
window. When more than one window
is opened, only the window that is clicked is closed. When the "Exit" button is clicked on the only window that is
opened, A.S.I.A. is logged off.
- Login user information
User information that is logged in on A.S.I.A. now
is displayed.
From the left side, there is "Login company code," "Login company," "Login user
code" and "Login user name."
- Online manual startup button
When the button that has the A.S.I.A. logo is
clicked, the HTML file that has item comments from the window that is now open
is displayed.
 Process
screen
Here, common elements for each process screen
are explained.
- Text box
Characters and amounts are enteres using the
keyboard.
When master data is entered, double-click on the text box or put the
cursor on the text box and press the F3 key at the same time and then the pop-up screen is opened. It is possible to select data from the pop-up screen and
enter it. However, the yellow text
box is only for display and entry is impossible.

It is also possible to manually enter into the text box that is for master
data. But, when a non-existing
code is entered and the cursor is moved to another item, the following message
is displayed; "Entry data doesn't exit."
The entered contents are cleared.
When entry required items are blank in the text box and the "Save" button is
clicked, the following message is displayed; "There are items that are not set"
and the cursor is moved to the un-entered text box.
- Text box for date entry
Enter the entry date, delivery date and the
settlement date by the dominical year.
The "/" (slash) between the year and month, and month and day are
displayed automatically, so entry is not needed.

When the text box for the entry date is double-clicked, a calendar is
displayed for selecting the date.

Date entry can be simplified by using the following function keys.
-
F2
Date is cleared.
-
F3
System entry date is set in the text box.
-
F4
A calender is displayed.
- Option button
This button selects options. Only one option can be selected at one
time. The selected option is
displayed with a black dot in the circle.

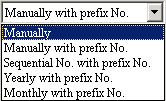
- Combo box
Click on and a list of selections is
displayed. Click on a needed item
to select it.
- Button
When a button is clicked, processes such as command
execution and canceling are done.
However, light colored buttons can not be used.

Also, when the "Save" button is clicked without entry of essential items,
saving is not done and the cursor is moved to the "Details" button
automatically. It is suggested to
click the button for necessary processes.

- Check box
This box selects options. It is possible to select more that one option at the same
time. The selected options are
displayed by a mark in the square box.

Usually, there are only two statuses,  (selected status) and
  (unselected status). Some option contents have an
intermediate status
  (optional or not yet setup, etc.).
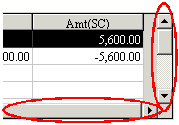
- Scroll bar
When information does not fit into the screen, a
scroll bar is displayed on the right side or bottom of the screen. In order to see un-displayed
information on the screen, drag the scroll bar or press the arrow buttons.
- Tab sheet
Screen items are switched by selecting tabs. Usually, each tab has similar
information.

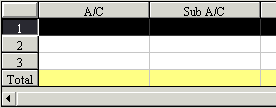
- Spread sheet
This is an item group with a tabular form that displays voucher detailed rows.
For master data entry, when the mouse is right-clicked on a cell of the spread,
a pop-up searching screen is displayed.
It is possible to select data from there and enter it. However, yellow cells are just for
display, so entry is not possible.
 Pop-up
screen
When a text box is double-clicked or a cell of
the spread sheet is right-clicked, the pop-up screen is displayed to select
master data and voucher No.
The following pop-up screen sample is for selecting a "Registered employee as
operator" that is displayed by double-clicking the "In charge" item.
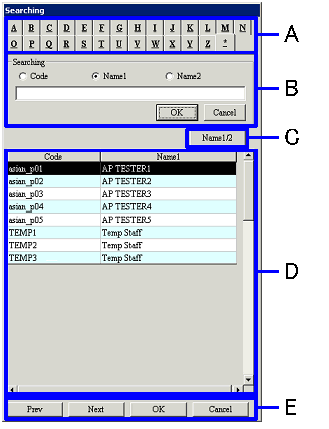
- Searching key
This key is used to narrow down the pop-up display
contents that are entered in when "Searching" using the alphabet at master data
registration.
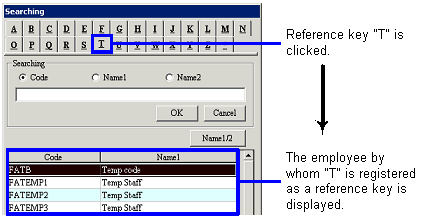
In the default, usually the "*" tab is selected and the pop-up is displayed
with all master data that can be selected in the entry screen. Master data that can be selected is
master data that has the "Active" check box OFF, so it can not be selected for
entry but can be selected for output forms.
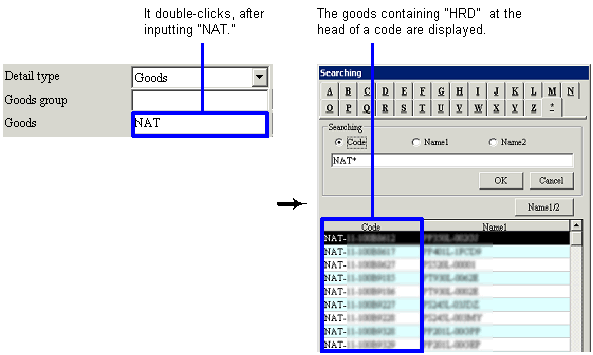
In the pop-up for sales/purchase goods, master data that has entered characters
from entry screen items at the beginning are displayed.
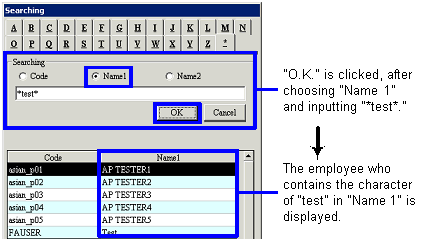
- Searching
This is used for narrowing pop-up display contents
by master data "Code" and "Name."
Select the searching object by the option button and enter the searching
string and then click the "OK" button.
Fuzzy searching is possible when the character
string is specified.
- "Name1/2" button
This is the same function as the "Convert name"
button on the process screen. This
switches "Name 1" and "Name 2" that are displayed from the list.
- List
A list of master data that can be entered is
displayed.
Before narrowing down by the searching key and character string, a list that is
already narrowed down may be displayed.
For example, the correspondent of "Vendor" from the "Correspondent type"
can not be specified for the "Accountee."
So, if the pop-up is displayed in the "Accountee," the list of
correspondents outside of the "Vendor" is displayed. Also, only departments that have authority are displayed at
department selection.
- Buttons
-
Prev
When the registered master is over 500, the list for each 500 is
displayed. This is used to switch
500 units. When the previous 500
are displayed, it is clicked.
-
Next
When the registered master is over 500, the list for each 500 is
displayed. This is used to switch
500 units. When the next 500 are
displayed, it is clicked.
-
OK
When the master that is selected from the list is entered into the process
screen item, it is clicked.
-
Cancel
This is clicked to cancel master selection.
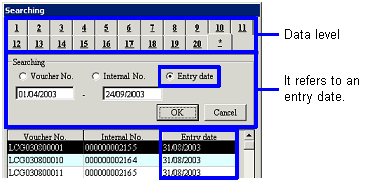
In the pop-up for the voucher number, the data
level selection tab is displayed instead of the searching key and the "Entry
date" is added to searching.
 Fuzzy
searching (Wildcard searching)
"Fuzzy searching (wildcard searching)" using "*"
and "?" for searching characters when the master and number range such as
forms, data searching and pop-up screens are specified.
- "*"
This means more than 0 optional characters
- "?"
This means 1 optional character
|
Searching condition sample
|
Search result sample
|
|
*
|
All data is the searching object.
However, no data is excluded.
|
|
*Account
|
Only data that has the word "Account" at
the end is the searching object.
|
|
X*
|
Only data that has "X" at the beginning
is the searching object. The number
of characters from the second character is not considered.
|
|
??Account
|
Only data with which the 3rd character or subsequent ones is
"Account" is the searching object.
Only data that has "Account" as the 3rd
character is the searching object.
(Example) When the word "01Account" is extracted, enter "??Account." It can not be extracted by "????Account."
|
|
??AA*
|
Only data that has "AA" as the 3rd and
4th characters is the searching object.
The number of characters from the 5th character is not considered.
|
|
*AA????
|
Only data that has "AA" as the 5th and
6th character is the searching object.
|
When "*" and "?" are used for the beginning
items (from) of the range specification field, the exit item (to) and "-" are
hidden. "*" and "?" can not be
entered as the exit item.
![]() A.S.I.A. screen configuration
A.S.I.A. screen configuration![]() Login
screen
Login
screen


![]() Fuzzy
searching (Wildcard searching)
Fuzzy
searching (Wildcard searching)