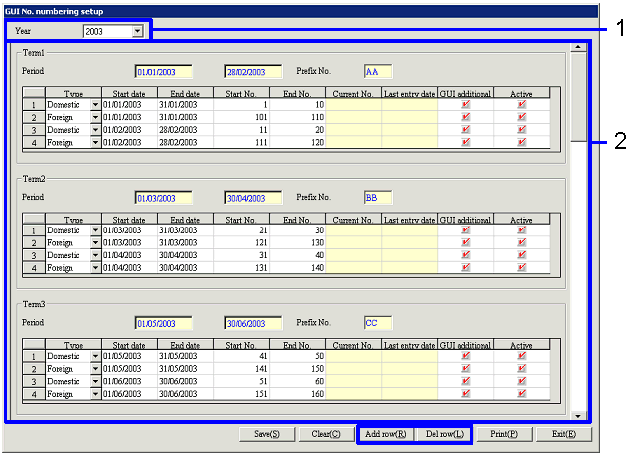
 GUI No. numbering setup
Setup GUI No. numbering.
 Screen
Transition
[Master management]
↓
[Logistics master]
↓
[Setup]
↓
[GUI No. numbering setup]
↓
[GUI No. numbering setup] screen
 Item
Setup

- Select object year
-
Year
Enter the year. The current year
will display as default.
- GUI No. Numbering setup
When there are contents already registered for the
entered year, the contents will be displayed.
-
Period (in each [Term1-6])
The range of the object year/month/day for each period will be displayed.
-
Prefix No. (for each [Term1-6])
Enter the prefix number to allocate to the GUI No. for each period. Entries of prefix numbers that overlap
with other periods cannot be entered.
Prefix numbers of periods that have already been numbered cannot be changed.
[Spread]
The "Start date" and "End date" by month will
display as default in order to allow numbering by month by "Type." To add and delete rows, click the "Add
row" button and / or the "Delete row" button.
-
Type
Select either "Domestic" or "Foreign."
-
Start date, End date entry
Enter the object period to execute the numbering for each "Period."
When the "Type" is "Domestic," make sure that there are no entries of dates
that are not beyond the "Period" that are not included in the range of each "Period"
and that there are no periods that overlap in the same period and same type.
-
Start No.
Make an entry with up to 8 single-byte numbers. When the number is entered, the number minus 1 will
automatically be set as the last No. of the row.
The Start No. of rows that have already been numbered (rows with the "Current
No." and "Last entry date" displayed) cannot be changed.
-
End No.
Make an entry with up to 8 single-byte numbers. When the number is entered, the number plus 1 will
automatically be set as the start No. for the next row.
For rows that have already been numbered (rows with the "Current No." and the "Last
entry date" displayed), changes can be made within the range of "Current No."
"End No."
-
Current No.
When numbering has already been executed, the No. will display. Changes cannot be made.
-
Last entry date
The date when the GUI No. was last numbered will appear. Changes cannot be made.
-
GUI additional acquiree
When numbers to use for the numbering have been additionally provided from the
government, turn the checkbox ON.
-
Active
 Buttons
-
Save
-
Clear
The dialogue box asking to specify the period to clear will appear. Select either by specifying a period
such as term1-6 or by specifying with the "Object" checkbox, and then click on
the "Execute" button to execute clear.
-
Add row
The [Add row] dialogue will appear. Select either "Add row" or "Add row by
GUI additional acquiree" and then click the "OK" button.
A new row will be added by copying the "Type" of the previous row to the row
below where the cursor is placed.
When "Add row by GUI additional acquiree" is selected, rows will be
added with the checkboxes for "Start date," "End date," and " 'GUI additional
acquiree" turned ON. When " 'GUI additional acquiree" checkbox is turned on in "Add
row by GUI additional acquiree," the checkbox cannot be manually turned OFF.
-
Del Row
Rows that have already been numbered (rows with the "Current No." and "Last
entry date" displayed) cannot be deleted.
When a row is deleted, the number with 1 subtracted from the "Start No."
of the row after the deleted row will be automatically set as the "End No." for
the row before the deleted row.
-
Print
-
Exit
![]() GUI No. numbering setup
GUI No. numbering setup![]() Screen
Transition
Screen
Transition![]() Item
Setup
Item
Setup
![]() Buttons
Buttons