 Procedure for approval of claims data
 Functions outline
[Receipt data approval] approves the target data selected from among the already entered Claims data. The approved data is subject to auto journal.
 1. Screen display method
- [Claims] → [Uncollected
Control] → select [Approve].
- Select [Receipt Data Approval] from the menu.
→ [Receipt data approval] screen will appear.
 2. Searching conditions entry

→To Menu Reference
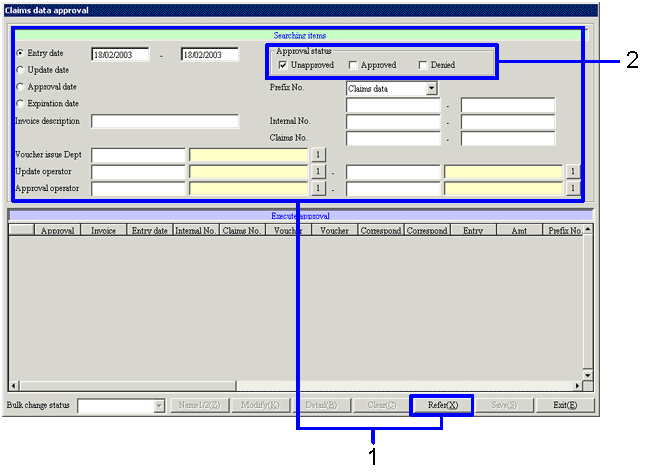
- Enter the searching conditions for the data to be approved, and click the "Refer (X)" button.
To increase search speed, enter detailed searching conditions.
The following data will not be extracted to be approved:
- Data already settled
- Data already auto-journalized
- Data for which monthly invoices have already been issued
- Data for which claims/debts balance notices have already been issued
- When modifying the status by extracting the approved data, check the "Approval" check box in [Approval status].
 3. Approval of claims data

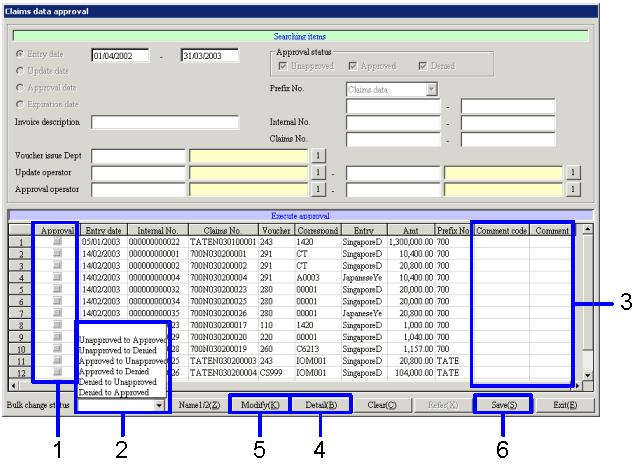
- To modifying the approval status individually, click the "Approval status" check box in the spread.
Select the approval status from "Unapproved( )," "Approved(
 )," and "Denied(
 )."
)."
- To modify the approval status of the extracted data in batch, select the approval status from the pull-down menu.
- Enter the Approval comment in the data of which approval status has been modified.
Right-click on the [Comment code] column of the data of which the approval status has been modified opens another window and you can select an Approval comment from the pop-up menu. You can also enter a text directly in [Comment name].
- To confirm the content of claims data, click the "Details (K)" button. All items will be dimmed, and no modification can be made.
- To modify the content of claims data, click the "Modify (K)" button.
→ [Claims entry] screen will appear, and it allows you to modify the data. All the items can be modified except [Internal No.] and [Claims No.].
(To modify approved data, you must change the approval status to "Unapproved" or "Denied" and save the data.)
- Click the "Save (S)" button.
![]() Procedure for approval of claims data
Procedure for approval of claims data![]() Functions outline
Functions outline![]() 1. Screen display method
1. Screen display method![]() 2. Searching conditions entry
2. Searching conditions entry
![]() 3. Approval of claims data
3. Approval of claims data