 Procedure for debt data approval
 Function Outline
Approve the required data of the debt data that has been already entered. You can
resister claims data in pattern as needed in your operation. The approved data becomes the subject data for auto-journal.
 1. Screen
Display Method
- [Debts] → [Unpaid
Control] → select [Approval].
- Select [Debts Data Approval] from the menu.
→ The [Debt data approval] screen is displayed.
 2. Searching Condition Entry

→To Menu Reference
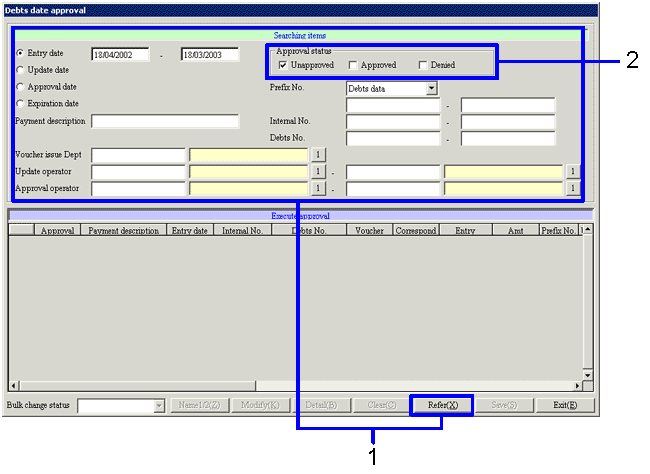
- Enter the search criteria for the data to be approved. Click the "Refer (X)" button.
To improve the search speed, enter the searching condition in as much detail as possible.
The following data is not extracted as the object of approval.
- Data that has been already settled,
- Data that has been already auto-journalized,
- Data whose monthly payment notice has been already issued,
- Data whose claims/debts balanced
notice has been already issued.
- To extract the data that has been already approved and to change its status, select the [Approved] checkbox in [Approval status].
 3. Approving the Debt Data

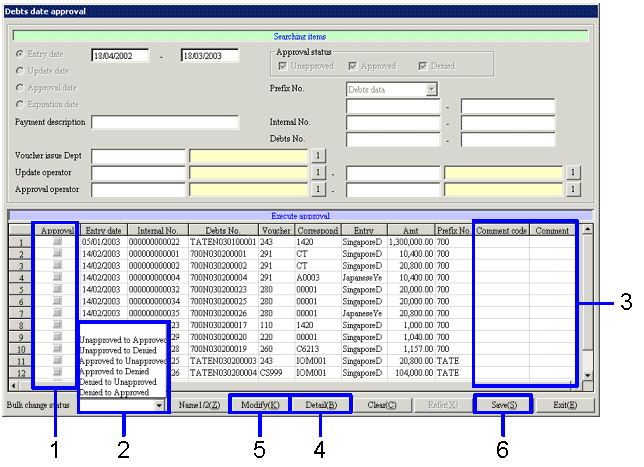
- To change the approval status individually, select the [Approval status] checkbox in the [Spread] and change the status.
Select the approval status from [Unapproved ( )], [Approved (
 )] or [Denied (
 )].
)].
- To change the approval status of the extracted data collectively, select the approval status from the pull-down menu.
- Enter an approval comment for the data whose approval status is changed.
Position the cursor in [Comment code] column of the data whose approval status is changed and click the right mouse button. It is then possible to select the approval comment in the window that opens up separately. It is also possible to directly enter text in the [Comment name] column.
- After confirming the debt data, click the
"Detail (B)" button. All items are displayed shaded out and they cannot be modified.
- To confirm the debt data, click "Modify (K)" button.
→ The [Debts entry] screen is displayed and it becomes possible to modify the data. It is possible to modify items other than [Internal No.] and [Debts No.].
(To modify the approved data, it is necessary to change the approval status to [Unapproved] or [Denied] and to save the status once.)
- Click the "Save (S)" button.
![]() Procedure for debt data approval
Procedure for debt data approval![]() Function Outline
Function Outline![]() 1. Screen
Display Method
1. Screen
Display Method![]() 2. Searching Condition Entry
2. Searching Condition Entry
![]() 3. Approving the Debt Data
3. Approving the Debt Data