 Procedure for purchase approval
 Outline
Approve purchase data.
 1. Screen display method
- Select [Purchase Control] → [Purchase Control] → [Update].
- Select [Purchase Approval] from menu options.
→ The [Purchase approval] screen will be displayed.
 2. Searching conditions entry

→To Menu Reference
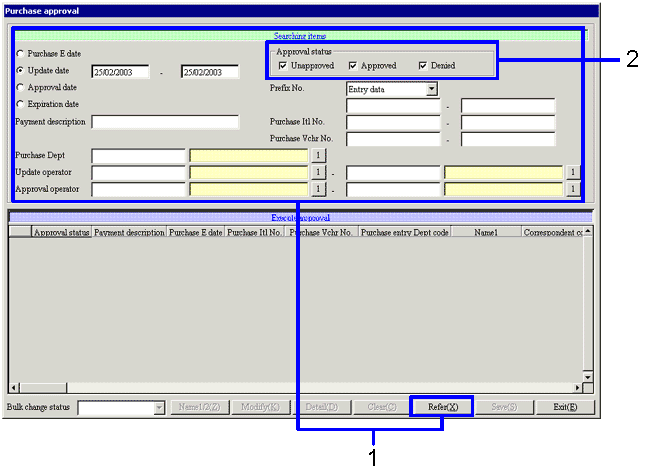
- Enter searching conditions for data to be approved, and click on the "Refer (X)" button.
Enter the most specific searching conditions possible to speed up searches.
- When searching to change the status of already approved data, activate "Approval" checkbox under [Approval status].
 3. Data approval

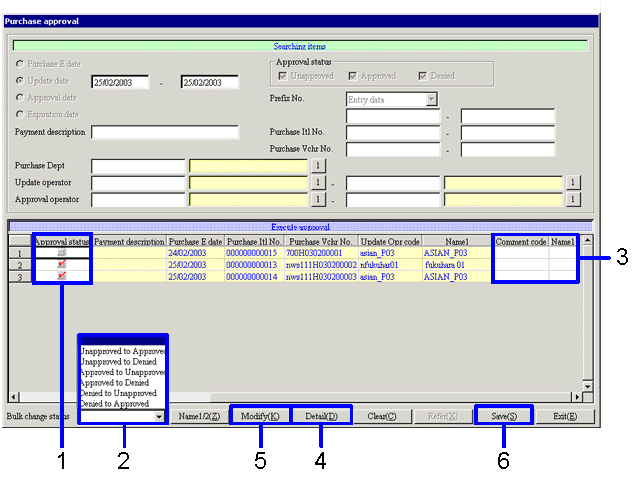
- Click the appropriate spread [Approval status] checkbox when changing approval status individually. Select approval status from among "Unapproved (
 )," "Approved (
 )," or "Denied (
 )."
)."
- Select approval status from the pull-down menu to implement a bulk change of approval status for searched data.
- It is also possible to enter approval comments on data for which approval status has been changed.
Align cursor with the [Comment code] column for data for which approval comments will be entered, and right click to select approval comments from a popup window that opens separately. It is also possible to enter approval comments directly as text into the [Comment name] column.
- Click on the "Detail (D)" button to verify purchase data details. Details may be verified, but not modified.
- Click on the "Modify (K)" button to modify purchase data details. (To modify approved data, approval status must first be changed to "Unapproved" or "Denied" and the change saved before details can be modified.)
→ Data can be modified once the [Purchase entry] screen is displayed.
- Click the "Save (S)" button.
![]() Procedure for purchase approval
Procedure for purchase approval ![]() Outline
Outline![]() 1. Screen display method
1. Screen display method2. Searching conditions entry

3. Data approval
