 Employee
Setup
Employee setup
lets you make settings for employees who are involved in the operation of A.S.I.A.
It also establishes the approval authority in each of the subsystems as well as
the authorizing department.
→ To About Employee
 Screen Transition
[Server
applications]
↓
[System
Custodian]
↓
[Basic Setup]
↓
[Employee setup]
↓
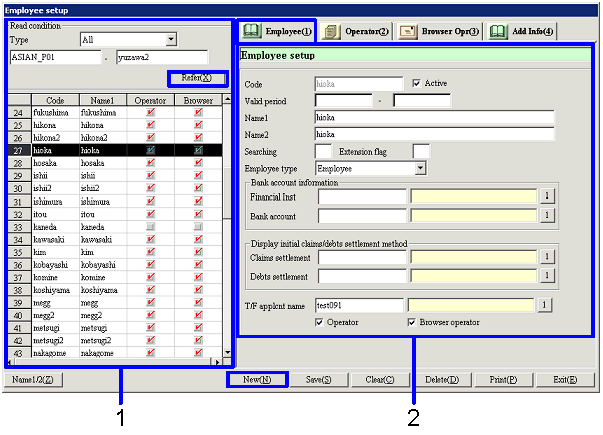
[Employee setup] screen -[Employee setup], [Operator], [Browser operator], [Additional information] tab
 Item Setup - [Employee setup]tab

- Selecting or newly
registering an employee
Click "Reference" to see a list of employees that fall under the read
condition. Select an employee to
make settings on. The information
on the selected employee then appears on [Details] tab.
Click "New" to newly register an employee.
- Employee code
Select an employee to be registered or referred
on. You can specify the range of
selection.
- Type
Select "All," "Employee," "Operator," or "Browser
operator" that best describes the status of the employee who is the subject of
the reference.
- Code, Name
The employee's code and name are shown.
- Operator
Only the names of the employees registered as A.S.I.A.'s operator are
checked. Initial setting on these
operators is made in accordance with the contract when A.S.I.A. is
introduced. You cannot add or
delete any operator on the screen only.
- Browser operator
Names of the employees registered as a browser operator in [Expenses management
Module] are checked. Initial
setting on these operators is made in accordance with the contract when A.S.I.A.
is introduced. You cannot add or
delete any operator on the screen only.
- Entering detailed
information
Set the items necessary to distinguish employees.
You can also set the bank account information, Settle method, and T/F applicant
name to appear on the initial display when T/F is made to employees.
- Code
Enter the employee's code.
Up to ten half-size characters can be entered.
- Active
- Term of validity
- Name1, 2
- Searching
- Extension flag
- Employee type
Select "Employee," "Temp Emp," or "Temp
transfer."
- Bank account information
Enter the name of financial institution and bank
account to appear on the initial display when an employee is specified as a
customer of in-company sales, or when any type of Expenses management payment
is made.
- Financial Institution
Select one of the financial institutions registered
in [Register financial institution] on [Common Master]. If you entered "Bank account"
first, the name of the financial institution in which the above bank account is
registered automatically appears on the display.
- Bank account
Select one of the bank accounts other than "Own bank account" that
are registered in [Register bank account] on [Common Master]. If you entered "Finncl
Institutn" first, select one of the bank accounts registered as a bank
account of that financial institution.
- Display initial claims/debts
settlement method
Set the "Claims settlement method" and "Debts settlement method" to
appear on the initial display when an employee is specified as the customer of
in-company sales, or when any type of expenses management payment is made. This setting is optional. You can choose from the claims
settlement methods registered in [Register claims settlement method]on [Claims Control Module], and from the debts
settlement methods registered in [Register debts settlement method]on [Debts Control Module].
You must enter "Debts settlement method code" on the employee who
receives automatic T/F payment with "Claims/Debts-B.A.C.
interlocking" set to "Interlock" in [Parameter Setup] on [Bank account
control Module].
- T/F applicant name
Set the name of T/F applicant
to appear on the initial display when the employee's name is entered as the T/F
destination in [Debts entry] on [Unpaid Control Module],
[Payment plan adjustment entry] on [Debts Control Module], as well as [Purchase
entry] and [Expenses management Module] on [Purchase ControlModule]. Choose from the Transfer applicant code
registered in [Register transfer applicant]on [Debts Control Module].
You must enter the T/F applicant name if "Claims/Debts-B.A.C.
interlocking" is set to "Interlock" in [Parameter Setup] on [System
Custodian Module].
- Operator
Names of the employees registered as A.S.I.A.'s operator are checked. No change can be made.
- Browser operator
Names of the employees registered as a browser operator in [Expenses Management Module] are checked. No change can be made.
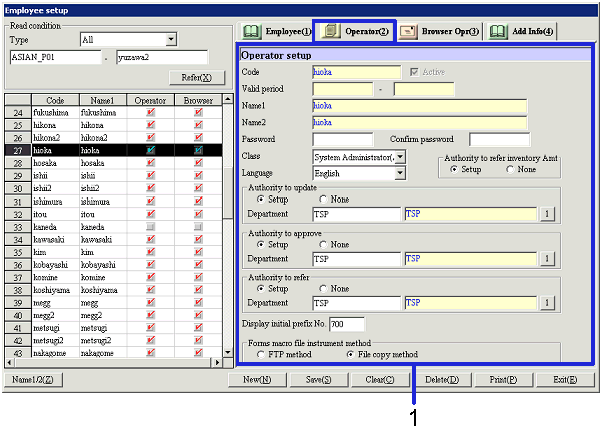
 Item Setup - [Operator] tab

- Entering the operator
information
The operator here means the person to operate the A.S.I.A. screen. Set the items and authority needed to
distinguish the operators.
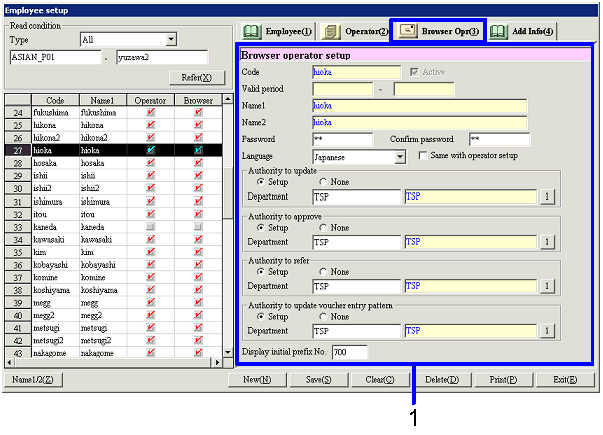
 Item Setup - [Browser
operator] tab

- Entering information on
the browser operator
Browser operator here means the person to operate the browser display of [Expenses
management Module]. Set the items
and authority necessary to distinguish the browser operators.
- Code, Active, Term of validity, Name
Information on the selected employee
appears on the display. No change
can be made.
(The items explained
below are shown only if the "Browser operator" check box is set to ON in [Employee
setup] tab.)
- Password, Confirm password
Enter the password to log in to A.S.I.A.
Up to ten half-size alphanumeric characters can be entered.
An error message appears if the password recorded in "Password" is
different from that of "Confirm password."
- Language
Select the language that appears on the initial display of log-in.
- Same with operator setup
Click this check box ON to make "Language," "Authority to update,"
"Authority to update Department," "Authority to approve," "Authority
to approve Department," "Authority to refer," "Authority to
refer Department," and "Display initial prefix No." show the
same data as that set in [Operator] tab.
Any data that has already been entered in the above items will be the same as
that in [Operator] tab.
If this check box is OFF, you can enter data in these fields, though the data
recorded in "Authority to update," "Authority to approve," "Authority
to refer," or "Authority to Update voucher entry pattern" is not
cleared.
The check box on the employee who does not operate the A.S.I.A. main unit is
set to OFF. The box on the
employee who operates the A.S.I.A. main unit is ON, which is seen on the
initial display.
- Authority to update
Determine whether the authority to update vouchers
needs to be set or not. If you
select "Setup," items to enter the department appear on the display. You can set the update authority on a
department basis. Select "Summary
Dept," "Department," or "Warehouse/Process Dept." If "Setup" is selected, "Authority
to approve" appears on the display.
- Authority to approve (can be set only if "Authority to
update" is set to "Setup")
Determine whether the voucher approval authority
needs to be set or not. If you
select "Setup," items to enter the department appear on the display. Specify the department to give the
approval authority (namely the department that is ranked equal to or below "Summary
Dept," "Department," or "Warehouse/Process Dept"
specified in "Authority to update").
If the wrong department is specified, an error message appears.
- Authority to refer
Determine whether the authority to refer to vouchers
needs to be set or not. If you
select "Setup," items to enter the department appears on the display. Specify the department to give the
reference authority by selecting "Summary Dept," "Department,"
or "Warehouse/Process Dept."
- Authority to update voucher entry
pattern
Determine whether the authority to update the voucher entry pattern needs to be
set or not. If you select "Setup,"
items to enter the department appear on the display. Specify the department to give the authority to update the
voucher entry pattern. The
department shall be ranked equal to or below "Summary Dept," "Department,"
or "Warehouse/Process Dept" specified in "Authority to update Department." If the wrong department is specified,
an error message appears.
- Display initial prefix No.
Enter the Prefix No. to appear on the initial display
in which vouchers with the numbering method set to "Prefix No.-" in [Voucher
numbering setup] are
entered. Up to six half-size
alphanumeric characters can be entered.
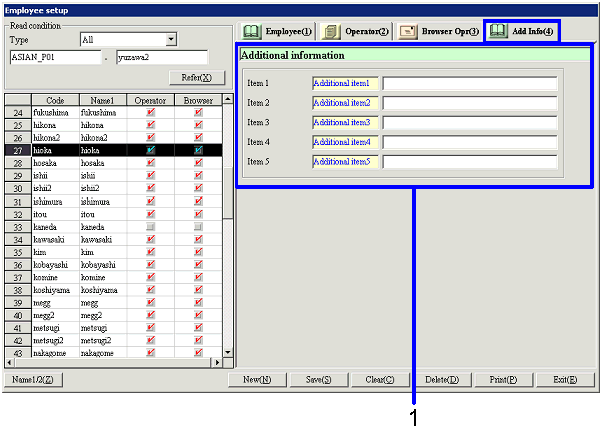
 Item
Setup -[Additional
information] tab

- Entering additional information
 [Buttons]
![]() Employee
Setup
Employee
Setup![]() Screen Transition
Screen Transition![]() Item Setup - [Employee setup]tab
Item Setup - [Employee setup]tab

![]() Item Setup - [Browser
operator] tab
Item Setup - [Browser
operator] tab
![]() Item
Setup -[Additional
information] tab
Item
Setup -[Additional
information] tab
![]() [Buttons]
[Buttons]