 Procedure for emergency sales entry
 Outline
The "Emergency sales entry" procedure is used to simultaneously register the shipping data and sales data.
 1. Screen display method
-
Select [Sales Control] → [Sales
Control] → [Entry].
-
Select [Emergency Sales Entry] from the menu.
→ The [Emergency sales entry] screen is displayed.
 2. Sales entry - Header tab entry

→To Menu Reference
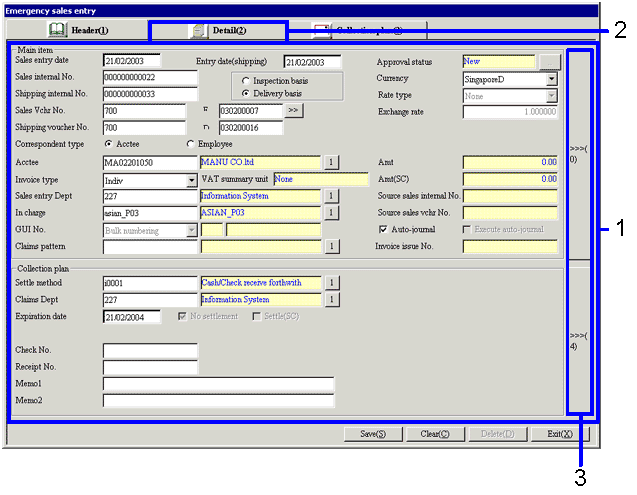
- Enter the sales data. The entry items are identical to those found in the Sales Entry screen.
The sales internal No. , Shipping internal No., Invoice No., and Shipping No. are automatically assigned the numbers which will not duplicate with registered vouchers.
-
Click the Detail button and enter the detail data.
-
Click the ">>>(0)" button to toggle between the Main Item and Sub Item area displays.
Data can be entered from either display.
Click the ">>>(4)" button to toggle between the "Collection Plan" and "Header/Packing" Information area displays alternately. Data can be entered from either display.
 3. Sales entry - Detail tab entry

-
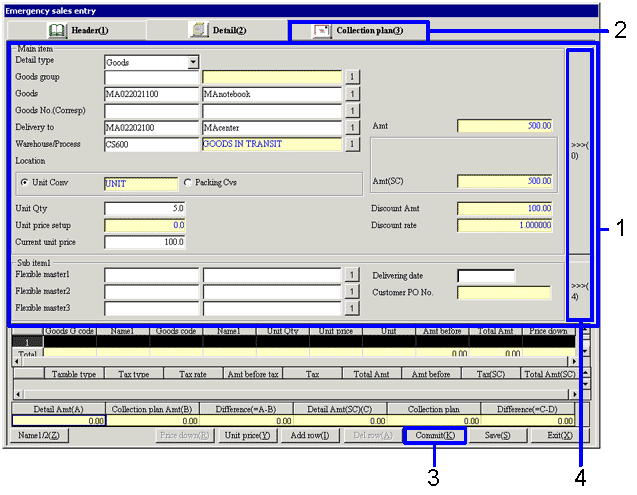
Enter the sales data. The entry items are identical to those found in the Sales Entry screen.
-
Click the "Commit (K)" button.
→ The spreadsheet is recalculated.
-
Click the [Detail] tab and enter the detail data.
-
Click the ">>>(0)" button to toggle between the "Main Item", "Auto-Journal Item", and "Detail/Packing" Information area displays alternately. Data can be entered from any of the displays.
Click the ">>>(4)" button to toggle between the Sub Item 1 and Sub Item 2 area displays. Data can be entered from either display.
 4. Sales entry - [Collection Plan] tab entry

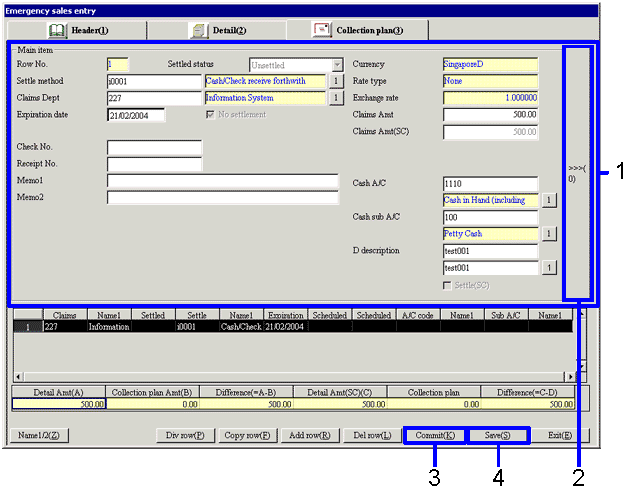
- Enter the sales data. The entry items are identical to those found in the Sales Entry screen.
- Click the ">>>(0)" button to toggle between the "Main Item" and "Sub Item" area displays alternately. Data can be entered from either display.
- Click the "Commit (K)" button.
→ The spreadsheet is recalculated.
- Click the "Save (S)" button.
→ The sales data is registered.
![]() Procedure for emergency sales entry
Procedure for emergency sales entry![]() Outline
Outline![]() 1. Screen display method
1. Screen display method![]() 2. Sales entry - Header tab entry
2. Sales entry - Header tab entry
![]() 3. Sales entry - Detail tab entry
3. Sales entry - Detail tab entry
![]() 4. Sales entry - [Collection Plan] tab entry
4. Sales entry - [Collection Plan] tab entry