 Procedure for debt entry
 Function Outline
Enter debt data in the order of Header tab, Details tab and Payment Plan tab.
 1. Screen Display Method
- [Debt] → [Unpaid
Control] → [Entry].
- Select [Debt Entry] from the menu.
→ The [Debt entry] screen is displayed.
 2. Header Entry
→To Menu Reference
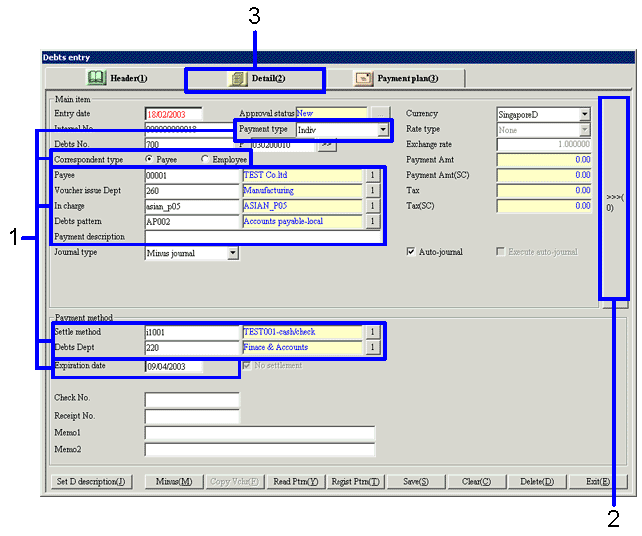
- Enter the "Payment type", the "Correspondent type", the "Payee", the "Voucher issue Dept", "In charge", the "Debt pattern", the "Payment description", "Settle method", the "Debt Dept" and the "Expiration date".
The other items are set automatically. Modify them manually as necessary.
- If necessary, click the ">>>(0)" button and enter data for the Header (reverse side).
- Click the [Details] tab and to enter the details.
 3. Details Entry
The procedure is explained for the case where two rows of details are entered.
→To Menu Reference
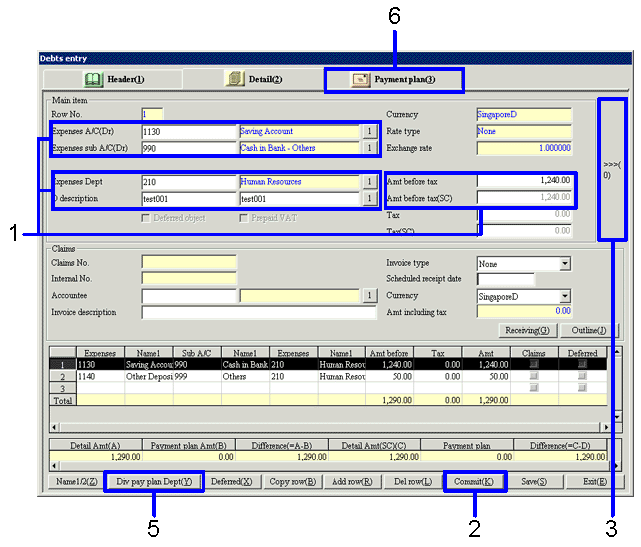
- Enter the "expenses A/C", the "expenses sub A/C", the "Expenses Dept", the "D Description", the "Internal/External type" and "Amt including tax(Amt before tax)". The other items are set automatically. Modify them manually as necessary.
The "Tax" is set automatically, although it is possible to adjust the fractions.
- Click the "Commit (K)" button
→ The entered data is registered and displayed in the first row of the [spread] below.
- If necessary, click the ">>>(0)" button and enter data for the Details (reverse side). If you click the "Commit (K)" button without entering the required items in Details (reverse side), an error message is displayed and the cursor moves to the column concerned.
- Select the second row of the [Spread] and enter the required items in the same way as with the first row.
Click the "Commit (K)" button,
- Click the "Div Pay Plan Dept (Y)" button. The data entered in the [Spread] in the [Details] tab is summarized as the payment plan data for each debt department.
The debt a/c specified in the debt pattern in the [Header] tab is entered in the debt a/c in the [Payment Plan] tab to be created.
The items specified in the payment method in the [Header] tab are entered in the settlement method and the expiration date in the [Payment Plan] tab to be created.
→ If you click the "Div Pay Plan Dept (Y)" button while the "Debts A/C" is not specified by the [Header] tab, the payment plan detail row is created by the expenses department. However, it is created as a blank in the "Debt A/C".
Note
If you click the "Div Pay Plan Dept (Y)" button while the payment plan is allocated, the warning message is displayed: The payment plan data has already been committed. Is it OK to execute a department split Note that if you select [Yes], the information for the existing payment plan detail row is discarded.
- Double-click the [Payment plan] tab to confirm and modify the payment plan.
 4. Confirming and Modifying the Payment Plan
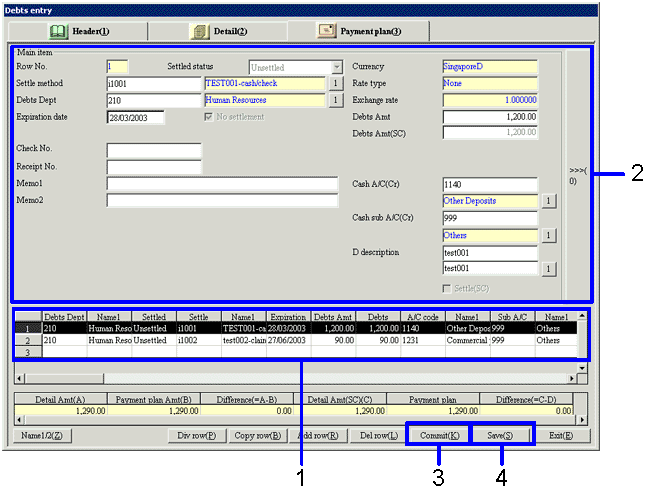
Confirm the payment plan that is displayed. Check that the amount entered in the Details tab and the amount entered in the Payment Plan tab are consistent and both of the columns of[ Difference (= A - B)] and the column of [Difference (= C - D)] are 0.00. If the amounts are correct, it is possible to save the plan by clicking the "Save (S)" button.
To modify the payment plan, follow the procedure below:
Modifying the collection plan
→To Menu Reference
- Of the payment plants in the [Spread], position the cursor on the payment plan to be modified.
→ The details of the selected payment plan are displayed in the [Main Item].
- Modify each item.
If the "Settle method" is changed, some of the entry items may be changed.
- Click the "Commit (K)" button.
→ If required items are not entered, the warning message is displayed: There is an item not specified. The cursor moves to the column of the item concerned.
→ The amount displayed in the [Spread] is recalculated.
Modify the amounts to make both the column of [Difference (= A - B)] and the column of [Difference (= C - D)] equal to [0.00].
If the column of Difference is not [0.00], the data cannot be saved and the "Save (S)" button is disabled.
- Click the "Save (S)" button.
To summarize the payment plan
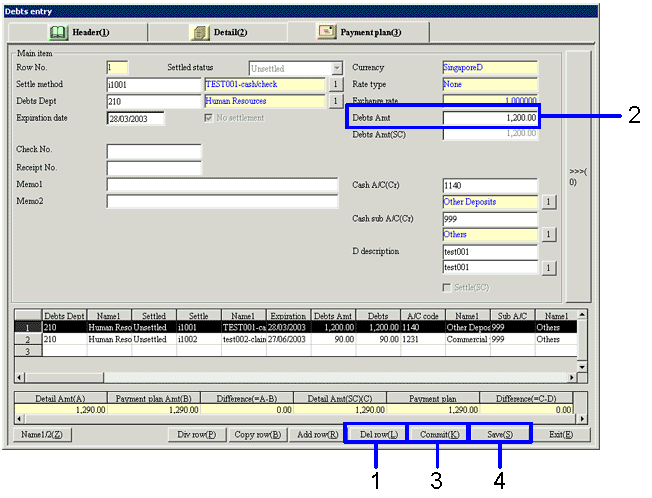
- Position the cursor on the payment plan to be deleted and click the "Del Col (L)" button.
- Position the cursor on the payment plan where the plans are summarized, and modify "Debt entry Amt".
- Click the "Commit (K)" button.
→ The [Display Spread Amt] is recalculated.
Modify the amounts to make both the column of [Difference (= A - B)] and the column of [Difference (= C - D)] equal to [0.00].
If the column of [Difference] is not [0.00], the data cannot be saved and the "Save (S)" button is disabled.
- Click the "Save (S)" button.
To divide payment plan
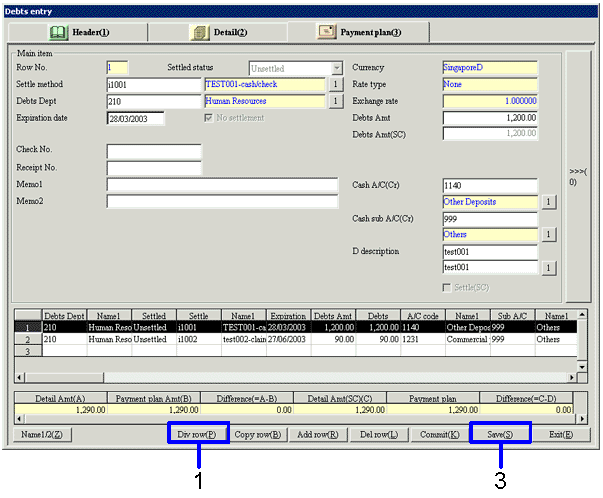
- Position the cursor on the row to be divided within the Spread, and click the "Div Row (P)" button.
→ The [Divide Row] screen is displayed.
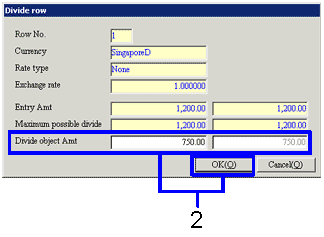
- In "Divide object Amt", enter the amount in the row after division, and click the "OK (O)" button.
→ The [Entry amount] in the divide source is recalculated.
→ The divided [payment plan] is added to the last row of the [Spread] of the Payment Plan tab.
- Click the "Save (S)" button.
 5. Voucher Cancel
The process for canceling vouchers differs according to the approval status of the voucher.
Cancellation of unapproved vouchers
Call up the voucher using the Internal No. or Deb No., then click the "Delete (D)" button.
Cancellation of vouchers that have been already processed and approved or denied
It is possible to cancel the voucher in two ways, by using the [Minus Journal] and the [Reverse Journal].
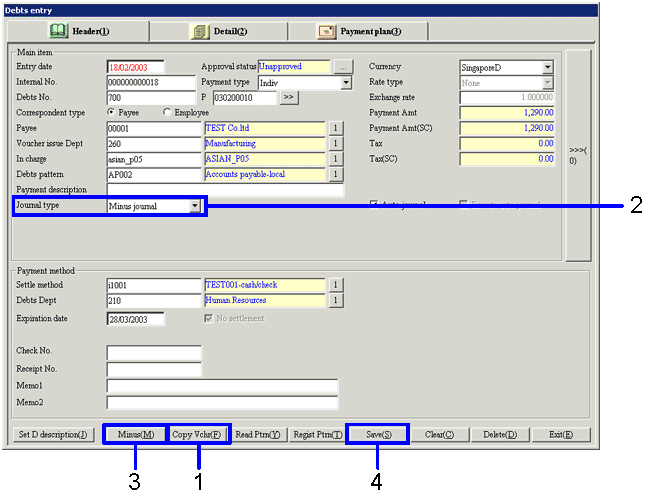
- Call up the object voucher and click the "Copy Voucher(F)" button.
- Select a "Journal type of minus" from [Minus journal] or [Reverse journal].
If [Reverse journal] is selected, modify the "Expenses A/C" and "Expenses sub A/C" in the [Detail] tab as necessary.
- Click the "Minus (M)" button.
The amount is displayed as a negative amount.
- Click the "Save (S)" button.
![]() Procedure for debt entry
Procedure for debt entry![]() Function Outline
Function Outline![]() 1. Screen Display Method
1. Screen Display Method![]() 2. Header Entry
2. Header Entry
![]() 3. Details Entry
3. Details Entry
![]() 4. Confirming and Modifying the Payment Plan
4. Confirming and Modifying the Payment Plan


![]() 5. Voucher Cancel
5. Voucher Cancel