 Procedure for notes payable entry
 Function outline
In [notes payable entry], register the information to manage the notes payables and the setup for the auto-journal. Modification of notes data with updated data can also be made. However, update of the status itself cannot be done. After the registration, confirmation of the auto-journal will be made through the [Transfer voucher] screen.
 1. Screen Display Method
- Select [Debts] → [Notes Payable] → [Entry].
- From the menu, select [Notes Payable Entry].
→ The [Notes payable entry] screen will appear.
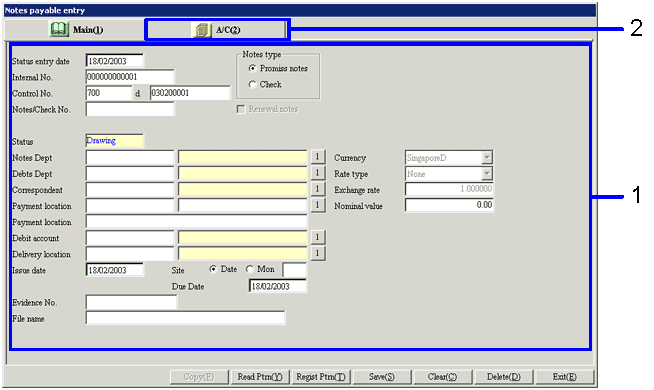
 2. [Header] entry

→To Menu Reference
- Select "notes type". Select from
"promise notes," and "check."
→ "Internal No." and "Control No." will be automatically allocated.
→ The "Payment location," "site," and "due date" will be automatically entered based on the
"correspondent" information, but can be changed.
→ "currency, " "rate type," and "exchange rate" will be displayed as the set up made in [company setup] in [system custodian]. Changes cannot be made.
- Click on the [A/C] tab.
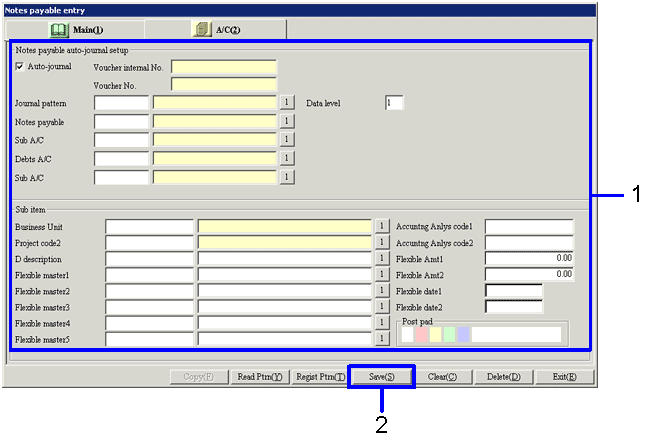
 3. [A/C] entry

→To
Menu Reference
- Enter in the [sub items] and the [notes payable auto-journal setup] of the [A/C] tab.
When the
"Journal pattern" is entered, the combinations of "notes A/C",
"payment interest A/C," and "Claims A/C" registered in [Register auto-journal pattern] will be automatically entered.
- Click on the "save (S)" button.
→ The [Transfer Voucher] screen will appear.
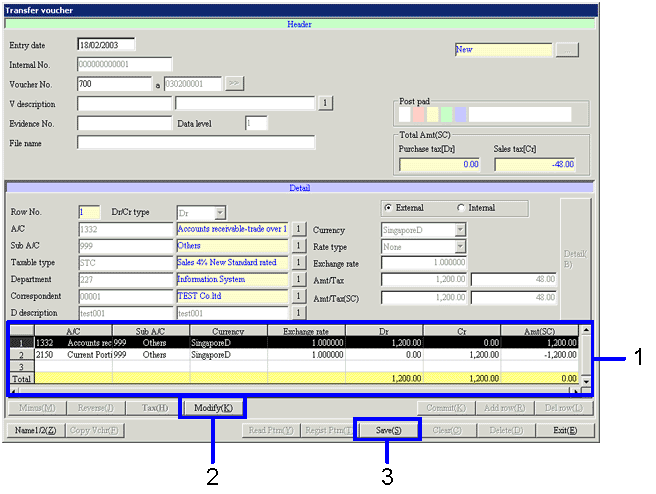
 4. Transfer Voucher confirmation

- Confirm the spread on the [details] of the
[Transfer voucher] screen.
- When the "modify (I)" button is clicked, the items in the
[Transfer voucher] screen can be modified.
- Click on the "save (S)" button.
→ The entered notes payable information will be automatically sorted.
![]() Procedure for notes payable entry
Procedure for notes payable entry![]() Function outline
Function outline![]() 1. Screen Display Method
1. Screen Display Method![]() 2. [Header] entry
2. [Header] entry
![]() 3. [A/C] entry
3. [A/C] entry
![]() 4. Transfer Voucher confirmation
4. Transfer Voucher confirmation