 Procedure for claim entries
 Function Outline
Claim entries are made in the [Claims Entry], using the header, details, and collection plan tabs.
 1.Screen display method
- [Claims] → [Uncollected
Control] → select [Entry].
- Choose [Claims Entry] from the menu.
→ The [Claims entry] screen will appear.
 2.Entering Headers
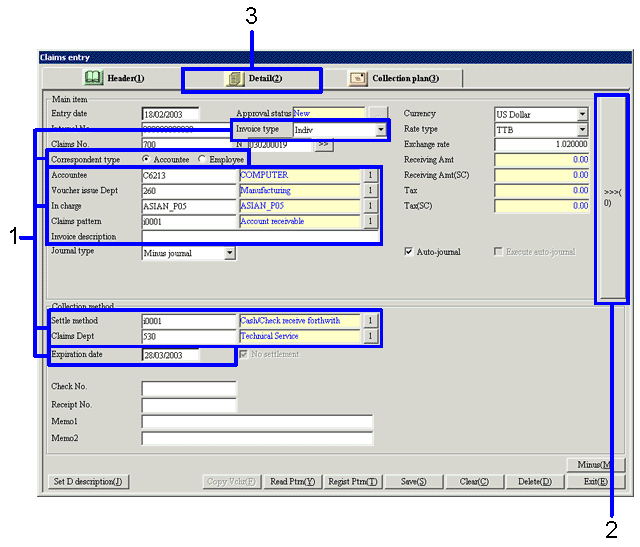
→To Menu Reference
- Make entries to "Invoice Type", "Correspondent Type", "Accountee", "Voucher issue Dept", "In charge", "Claims Pattern", "Invoice description", "Settle Method", "Claims Dept", and "Expiration date".
All other categories are automatically set up If necessary, make changes.
- If necessary, click on the ">>>(0)" button, and enter the header (back).
- Click the [Detail] tab and proceed to entering the details.
 3.Entering Details
This example will show you how to enter two lines worth of details.
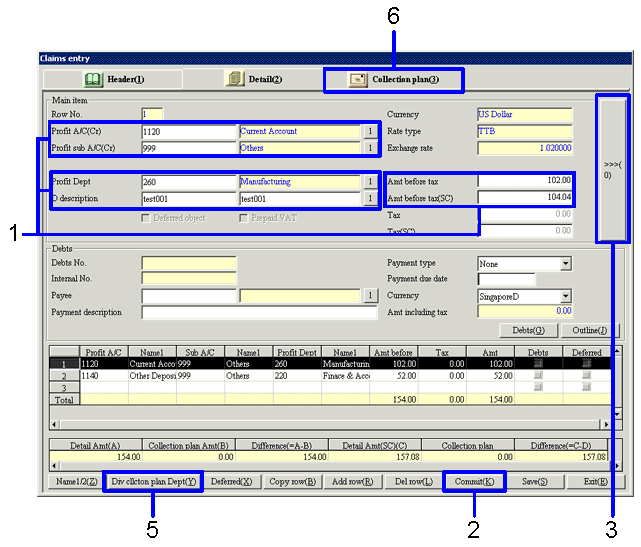
→To Menu Reference
- Enter data into "Profit A/C", "Profit Sub A/C", "Profit Dept", "D Description", "Internal/External Type", and "Amt including tax". Other categories are automated. If necessary, make changes.
"Tax" is automatically generated, but adjustments can be made for handling fractions.
- Click the "Commit (K)" button.
The contents will be registered, and the contents of the first line of the spread will appear.
- If necessary click the button,">>>(0)", and enter the details (back). If you click the "Commit (K)" button when you have not yet entered all the details (back) in the required categories, an error message will appear, and the cursor will move to the categories in question.
- Select the second line of the spread, and follow the same procedures as you did for the first line and enter the data in the required categories. Click the "Commit (K)" button.
- Click the "Div cllcton plan Dept(Y)" button. The data entered in the spread of [Details] will used as collection plan data for each claims department.
The claims A/C designated by the "Claim Pattern" of the [Header] tab will be added up in the claims A/C of the [Claim Plan] being created.
For the settle method and expiration date of the [Recovery Plan] being created, the category entered in the [Collection method] of the [Header] tab will be added up.
Note
If you click the "Div cllcton plan Dept(Y)" button when the collection plan is already committed, the following warning message will appear: "The data for the collection plan is already committed. Is it okay to sort the data by department"
If you choose "Yes" the existing information in the line(s) for collection plan details will be destroyed.
- Click the [Collection plan] tab and confirm/modify the collection plan.
 4.Confirming and Modifying the Collection plan
Confirm the collection plan that is displayed. You may save the data by clicking the "Save (S)" button, if the total amount of the [Details] tab matches that of the [Collection plan], and if the difference of the column of "Difference (=A-B)" and the column of "Difference (=C-D)" is 0.00.
Modifying the Collection plan
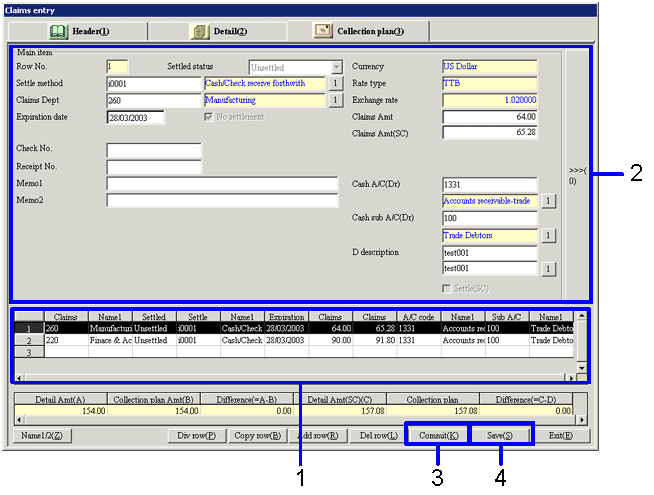
→To Menu Reference
- Move the cursor to the collection plan that you want to modify from among those in the spread.
The details of the collection plan you selected will be displayed in the "Main Item".
- Modify the information in each item.
If you make any changes to "Settle method," some of the input items may change
- Click the "Commit (K)" button.
If you do not enter data into all the necessary categories, a warning message will appear, ("Some items have not been set up.") and the cursor will move to one of the items in question.
"Spread of Amount Display" will be recalculated. If the total amount of the [Details] tab matches that of the [Collection plan], Adjust the amounts so that the column of "Difference (=A-B)" and the column of "Difference (=C-D)" of the "Spread of the Amount Display" are both 0.00. If you click the "Save (S)" button when the "Difference" column does not total "0.00",
you will not be able to save the file.
- Click the "Save (S)" button.
Consolidating Collection plans
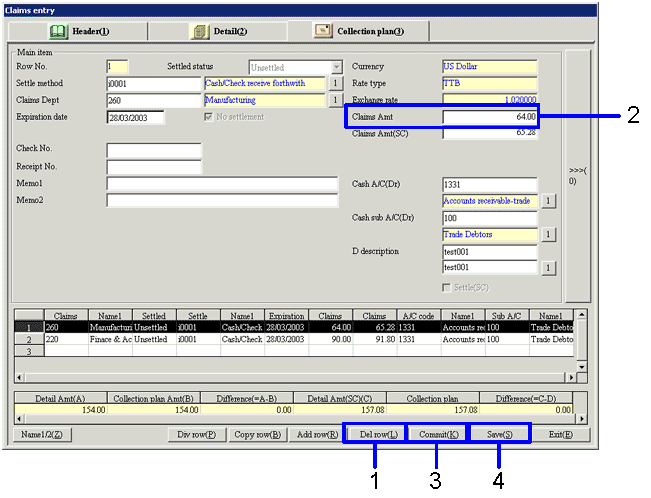
- Move the cursor to the collection plan that is to be deleted and click the "Del row (L)" button.
- Move the cursor to the collection plan to where the consolidation will take place, and modify the "Claims Amt".
- Click the "Commit (K)" button.
"Spread of Amount Display" will be recalculated.
Adjust the amounts so that the column of "Difference (=A-B)" and the column of "Difference (=C-D)" of the "Spread of the Amount Display" both total 0.00.
If you click the "Save (S)" button when the "Difference" column does not total "0.00", you will not be able to save the file.
- Click the "Save (S)" button.
Dividing a Collection plan
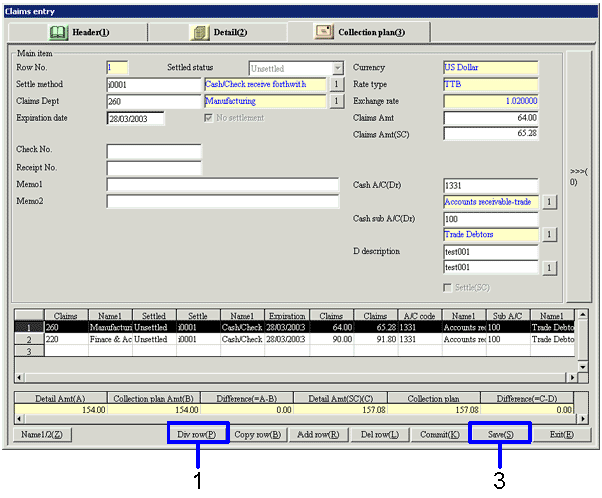
- Move the cursor to the line in the spread that you want to divide and click "Div row (P)".
[Div row] screen will appear.
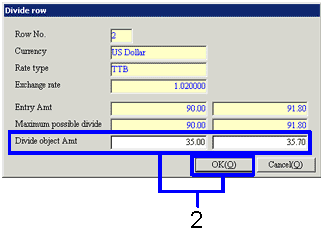
- Enter the total amount to be divided in the category "Divide object Amt" and click the "OK (O)" button.
→ The total of the original sum will be recalculated.
→ The collection plan that is divided will appear in the last line in the spread of the [Collection plan] tab.
- Click the "Save (S)" button.
 5.Cancelling Vouchers
There are two ways of canceling vouchers, depending on the voucher approval status.
Canceling Vouchers that Have Not Yet Been Approved
Call up the voucher in question by using the "Internal No." or the "Claims No." and click the "Delete (D)" button.
Canceling Vouchers that have Gone through the Approval Process (Approved or Unapproved)
There are two methods, the "Minus Journal" and the "Reverse Journal."
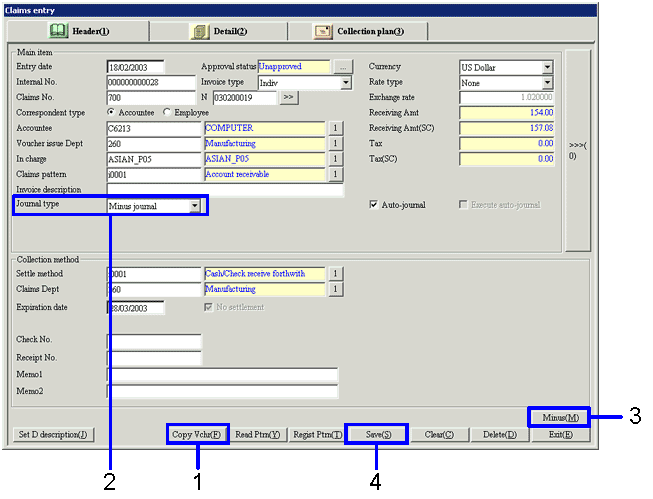
- Call up the voucher in question and click "Copy Vchr(F)" button.
- Choose "Journal type of minus" in the financial journal type.
If you selected "Reverse Journal", you may need to modify "Profit Sub A/C" and the "Profit A/C" of the [Details] tab.
- Click the "Minus Total (M)" button.
The amount will become a negative figure.
- Click the "Save" button.
![]() Procedure for claim entries
Procedure for claim entries![]() Function Outline
Function Outline![]() 1.Screen display method
1.Screen display method![]() 2.Entering Headers
2.Entering Headers
![]() 3.Entering Details
3.Entering Details
![]() 4.Confirming and Modifying the Collection plan
4.Confirming and Modifying the Collection plan


![]() 5.Cancelling Vouchers
5.Cancelling Vouchers