 Procedure for receipt of notes receivable data creation
 Function Outline
In [Create Receipt of Notes Receivable Data] create receipt data.
There are two ways. The first is to create receipt data by using the claims collection plan for accounts receivable (collection plan matching), and the second is to create receipt data by manual entry (not using collection plan matching).
The actual output process will be done in [Issue receipt of notes receivable].
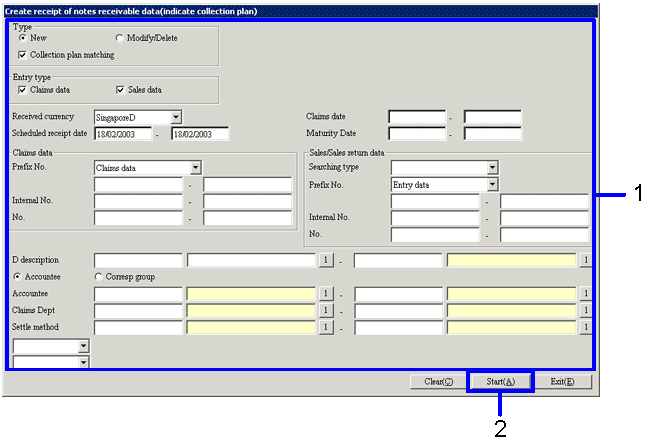
Search for object data for receipt creation in the [Create receipt of notes receivable data (indicate collection plan)] screen.
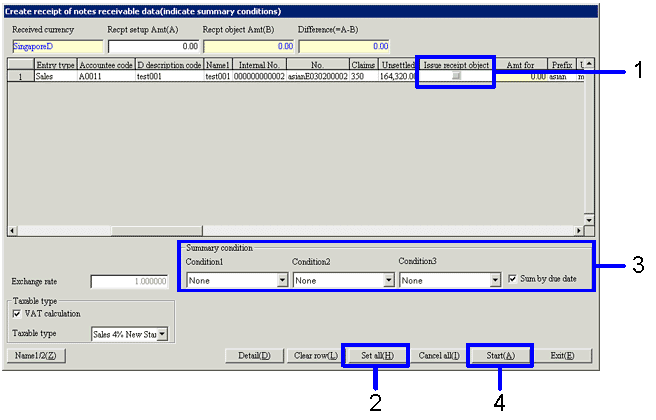
In the [Create receipt of notes receivable data (Indicate summary conditions)] screen, specify summary conditions and the receipt creation object data.
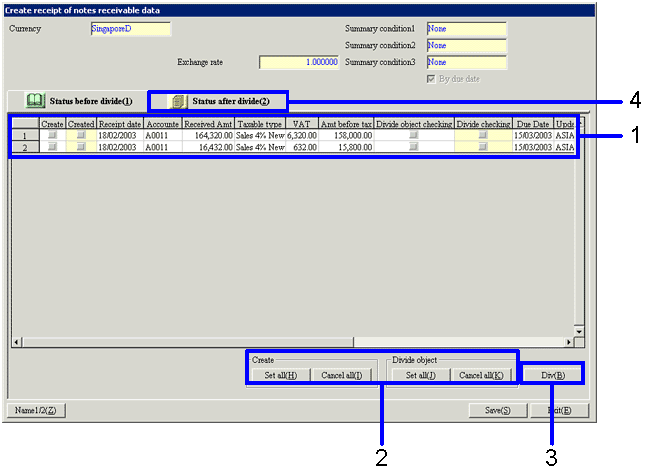
In the [Create receipt of notes receivable data ] screen, confirm the summary data and the receipt after division, and then create the data.
 1. Screen display method
- Select [Claims] → [Notes Receivable] → [Entry].
- From the menu, select [Create Receipt of
Notes Receivable Data]
→ The [Create receipt of notes receivable data (Indicate collection plan)] screen will appear.
 2. Searching Conditions Entry
→To Menu Reference
- Enter the searching conditions for the notes receivable to issue receipt.
When creating receipt of notes receivable data from the collection plan data, turn on the "collection plan matching" checkbox. You must enter the accountee.
- Click on the "Start (A)" button.
→ When the "collection plan matching box" is turned ON, the data that match the conditions will apprear on the [Create receipt of notes receivable data (indicate summary conditions) screen. Refer to "3. Indicate Summary Conditions."
→ When the "collection plan matching" checkbox is turned OFF, the [Create receipt of notes receivable data] screen will appear. Refer to "4. Receipt data entry."
 3. Indicate Summary Conditions
→To Menu Reference
- Turn ON the "Issue receipt object" checkbox for the collection plan data to create receipt.
- To issue receipt for all of the collection plan data found, click on the "Set all (H)" button.
- Select the summary conditions for the creation of receipt from the pulldown menu. From this summary condition, multiple collection plan data will be summarized into one receipt.
Set the summary conditions by using "Condition 1" to "Condition 3" in the [Summary condition]. You cannot select the summary conditions that have been already selected in another condition field.
Although not specified on the screen, collection plans of which the "accountee" and the "currency" are not the same cannot be summarized on the same receipt.
- Click on the "Start (A)" button.
→ The collection plan will be summarized with the "accountee / correspondent group," "summary conditions 1- 3," and "summary check by due date" as summary keys, and will show on the [Create receipt of notes receivable data] screen.
 4. Receipt Data Entry
→To Menu Reference
- When creating receipt data based on the collection plan data, select the data of which the receipt will be created from the [spread] of the [Status before divide (1)] tab.
When creating receipt data without reference to the collection plan data, enter the receipt data in the [spread].
Turn on the "create" checkbox of the data to create receipt.
When dividing rows during receipt creation, turn on the "divide object" checkbox.
- When creating receipt for all rows on the [spread], click on the "Set all (H)" button in the [create].
When dividing rows for all of the rows in the [spread], click on the "set all (J)" button in the [Divide Object].
- Click on the "Div (B)" button.
→ The [Divide Row] screen will appear.

- Set up the "Maximum divide number" and the "Minimum Amt after divide". The information from [receipt stamp duty setup] wil first appear, however, this can be changed.
- Click on the "Start (A)" button.
→ The row divide status of the receipts will appear on the [Create receipt of notes receivable data] screen.
- Click on the [Status after divide (2)] tab.
 5. Confirmation of Status after Divide
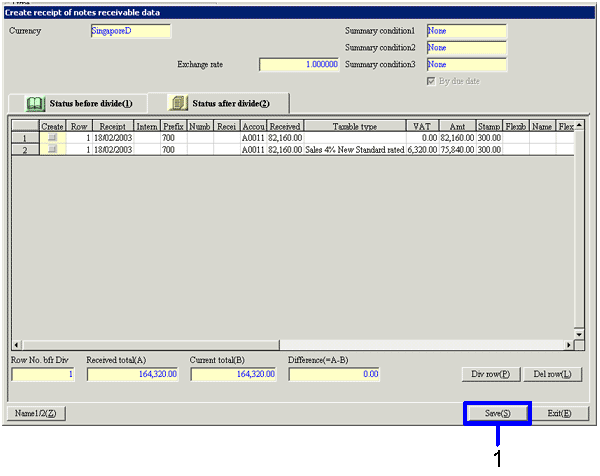
- Confirm the divide status of the receipt. One receipt for one row on the spread will be issued.
If the content requires no changes, click on the "Save (S)" button.
→ receipt can be issued in [Issue receipt of notes receivable] in [Issue voucher].
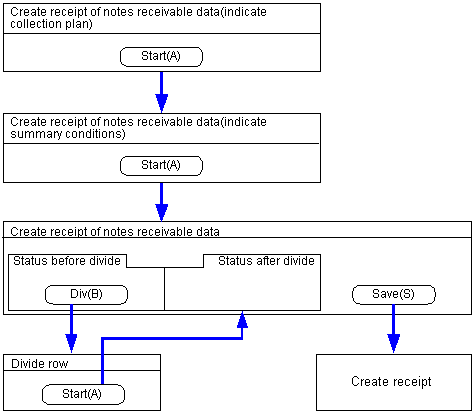
 Create Receipt of Notes Receivable Data Screen transition
The screen transition in the process of creating receipt of notes receivable data are as follows.
![]() Procedure for receipt of notes receivable data creation
Procedure for receipt of notes receivable data creation![]() Function Outline
Function Outline![]() 1. Screen display method
1. Screen display method![]() 2. Searching Conditions Entry
2. Searching Conditions Entry
![]() 3. Indicate Summary Conditions
3. Indicate Summary Conditions
![]() 4. Receipt Data Entry
4. Receipt Data Entry 

![]() 5. Confirmation of Status after Divide
5. Confirmation of Status after Divide
![]() Create Receipt of Notes Receivable Data Screen transition
Create Receipt of Notes Receivable Data Screen transition