 Procedure for notes receivable / claims settlement
 Function Outline
In [Settle (notes receivable / claims)], the notes receivable data saved in [Notes receivable entry] and the collection plan (including payment plan for offset settlement) will be settled.
When there is a difference between the total notes receivable amount and the claims collection plan amount, it is possible to adjust the difference by reading the payment plan data and the collection plan data from different settlement methods.
 1. Screen display method
- Select [Claims] → [Notes Receivable] → [Entry].
- From the menu, select [Settle (Notes
Receivable / Caims)].
→ The [Settle (Notes receivable / Claims) (from / to)] screen will appear.
 2. Searching conditions entry
→To Menu Reference
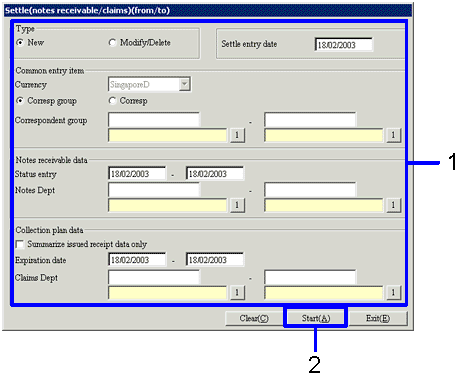
- Enter the searching conditions of the data to settle.
In order to improve the search speed, enter in as many details as possible.
Only auto-journal approval data can be used.
- Click on the "Start (A)" button.
→ The [Settle (notes receivable / claims) (object list)] screen will appear.
 3. Settle Objects Specification
→To Menu Reference
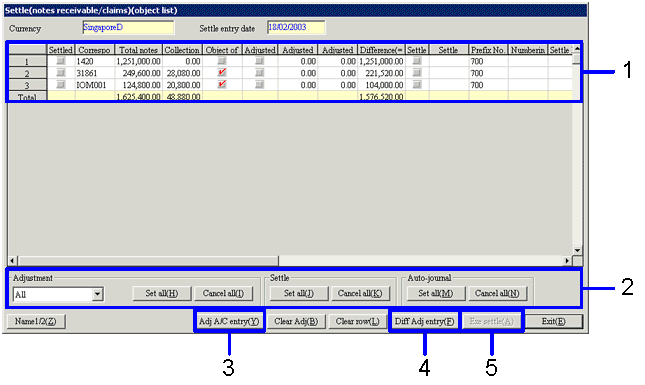
- Turn On the "settle object" checkbox for the data that will be settled. When making adjustments at the same time as the settlement, turn on the "Object of adjustment" checkbox. When executing auto-journal at the same time, turn ON the "Auto-journal object" checkbox.
- When settling all searched data, click on the "Set all (J)" button in the [settle]. When adjusting all data found at the same time as the settlement, click on the "Set all (H)" button in the [adjustment]. When making all of the searched data objects for auto-journal, click on the "set all" button in the [Auto-journal].
- When settling data of which the [Difference] is not "0.00," click on the "Adj
A/C entry (Y)" button.
→ The [Adjustment account entry] screen will appear. Refer to "4. Adjustment Account Entry."
- When making settlements and auto-journaling after adjusting the difference between the data found, click on the "Diff
Adj entry (F)" button.
→ The [Settle (notes receivable / claims)(differential adjustment) scrren will appearl. Refer to "5.Difference Adjustment."
- Click on the "Exe settle(A)" button.
→ Settlement process will begin, and auto-journal will be executed.
 4. Adjustment account entry
→To Menu Reference
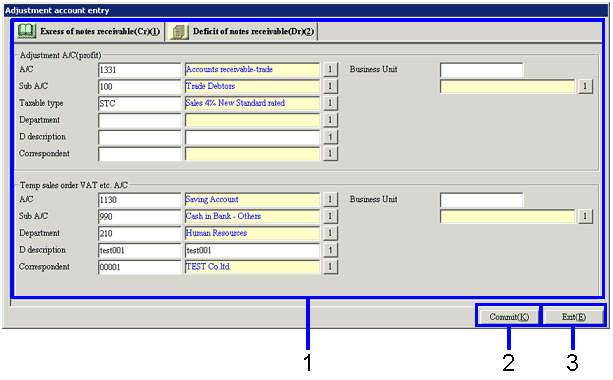
- Set up the adjustment A/C.
Depending on the amount in the "Total notes receivable (A)" and "Collection Plan total (B)" selected in the [settle (accounts receivable / claims) (object list)], the tabs and the items permitted differ.
When "total notes receivable (A)">"collection plan total (B)"
entry into the [excess of notes receivable (cr) (1)] tab is permitted.
When "total notes receivable (A)"<"collection
plan total (B)"
entry into the [notes receivable deficit(Dr)(2)] tab is permitted.
- Click on the "Commit (K)" button.
→ the the adjustment items will be registered.
- Click on the "Exit (E)" button.
→ Return to the [Settle (notes receivable / claims) (object list)] screen.
 5. Difference Adjustment
→To Menu Reference
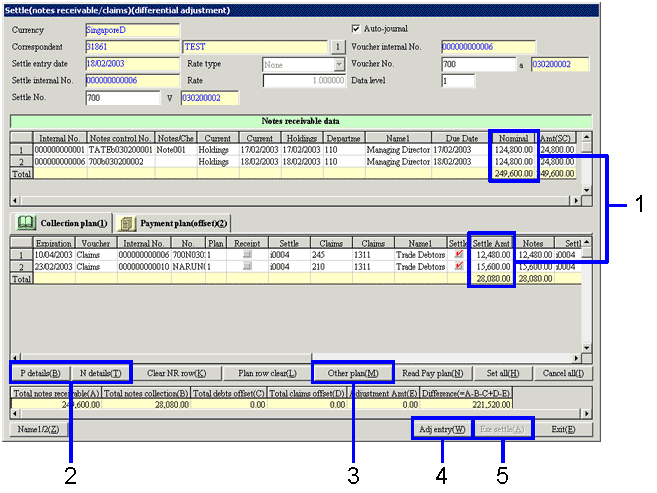
- Adjust the amount so that the total in the [nominal value of notes] in the [notes receivable data] and the [notes settlement] total in the [collection plan (1)] tab are equal.
- When the "Plan details (B)" button is clicked, the details of the selected collection data appear. Details can be confirmed but not modified.
When the "Notes details (T)" button is clicked, the details of the selected notes receivables appear. Details can be confirmed, but not modified.
- When collection plans are further allocated for reasons such as, the total in the "notes settlement" in the "collection plan (1)" tab is less than the total in the "nominal value of notes" in the "Notes receivable data", click on the "other collection plan (T)" button.
→ the [collection plan] screen will appear. Refer to "6. Collection Plan Specification."
- When making adjustments such as commission, click on the "adjustment entry (W)" button.
→ The [settling adjustment entry] screen will appear. Refer to "7. Adjustment Entry"
- Click on the "Exe settle (A)" button.
→ settlement process will start.
 6. Collection Plan Specification
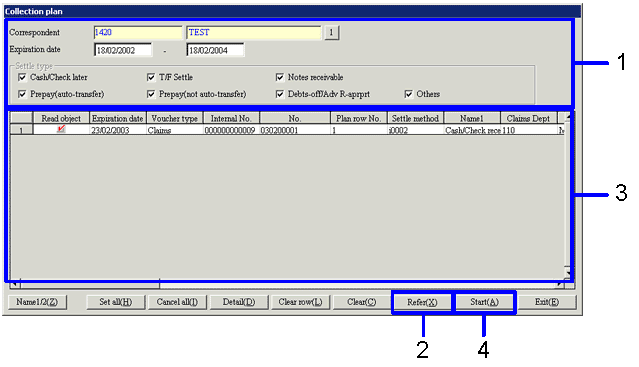
→To Menu Reference
- Specify the collection plan search conditions.
Always turn ON at least one [settle type] checkbox.
- Click on the "Refer (X) " button.
→ The search results will list up on the spread.
- Turn On the "Read Object" checkbox on the data that will be used for the settlement of notes receivable.
- Click on the "start (A)" button.
→ Return to the [settle (notes receivable / claims) (object list)]
screen. The collection plans of which the "read object" checkbox was turned ON will appear on the spread.
 7.Adjustment Entry
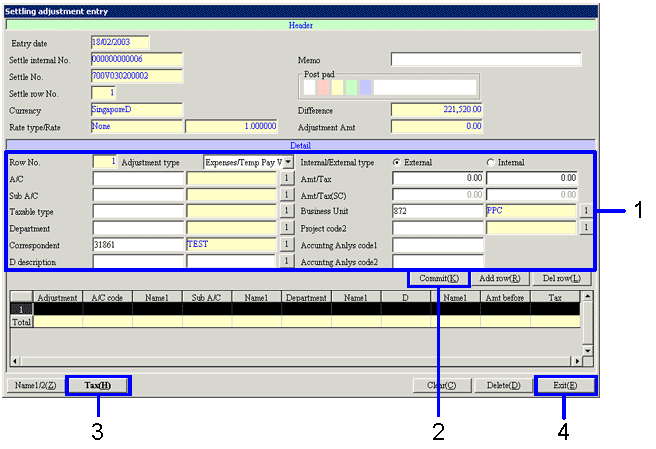
- Enter the journal and amount.
- Click on "commit (K)" button.
The entered data will appear on the spread (bottom side of the screen.).
- Always click on the "Tax (H)" button.
- Click on the "Exit (E)" button.
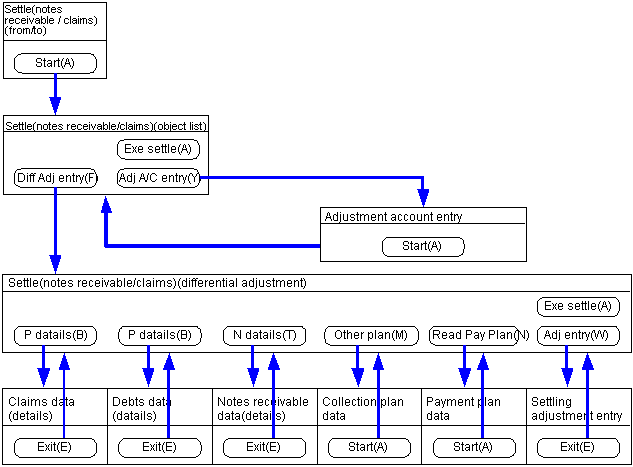
 Screen transition of settle (notes receivable / claims)
The transition of the screens in the settlement process for notes receivable / claims is as follows.
![]() Procedure for notes receivable / claims settlement
Procedure for notes receivable / claims settlement![]() Function Outline
Function Outline![]() 1. Screen display method
1. Screen display method ![]() 2. Searching conditions entry
2. Searching conditions entry
![]() 3. Settle Objects Specification
3. Settle Objects Specification
![]() 4. Adjustment account entry
4. Adjustment account entry
![]() 5. Difference Adjustment
5. Difference Adjustment
![]() 6. Collection Plan Specification
6. Collection Plan Specification
![]() 7.Adjustment Entry
7.Adjustment Entry
![]() Screen transition of settle (notes receivable / claims)
Screen transition of settle (notes receivable / claims) 