 Procedure for settle debts
 Functions outline
Executes settlement of payment plan data input in [Debts entry] and [Purchase entry].
Data that has not been approved, and auto-journal object that auto-journal is not executed are to be included in this process. However, it is possible to settle only part of all "Debts" (Partial Settlement Function).
 1. Screen display method
- Select [Debts] → [Debts
Control] → [Settle].
- Select [Settle Debts] from menu.
→ [Settle debts (from/to)] screen then appears.
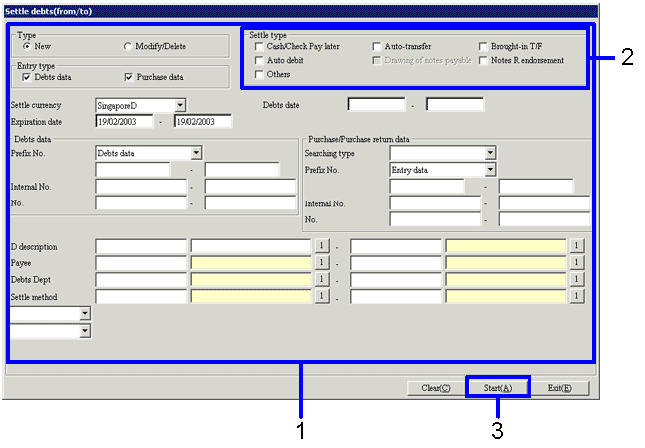
 2. Searching conditions entry
→To Menu Reference
- Input search conditions for debts data to be subject to settlement.
To accelerate the speed of extracting the data, make these conditions as precise as possible.
- At least one of the check boxes in the [Settle type] must have been activated.
If none of them have been activated, an error message will appear.
- Click on "Start (A)" button.
→ [Settle debts (settle object)] screen appears.
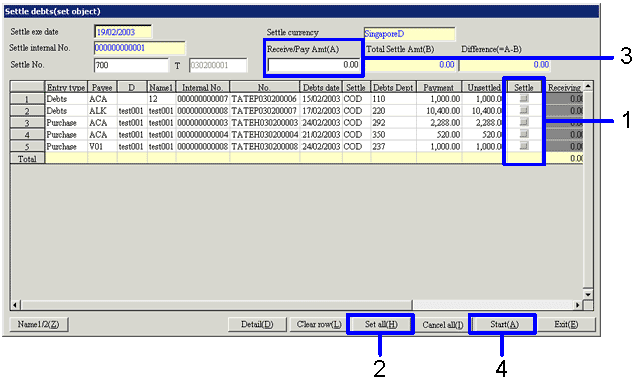
 3. Procedure for specifying settle object
→To Menu Reference
- Check the box marked [Settle object] for any debts data that you wish to indicate as object of settlement.
- If you wish to indicate all extracted debts data as object of settlement, click on "Set all (H)" button.
- Please input the settle amount in "Receive /Pay Amt (A)" button.
If there is a difference between this and the total settle amount, an error message will appear warning: " "Receive /Pay Amt (A)" does not match "Total Settle Amt (B)". Do you wish to proceed with execution?" The discrepancy can be adjusted in the "Settle debts (details entry)" screen, which appears next.
- Click on "Start (A)" button.
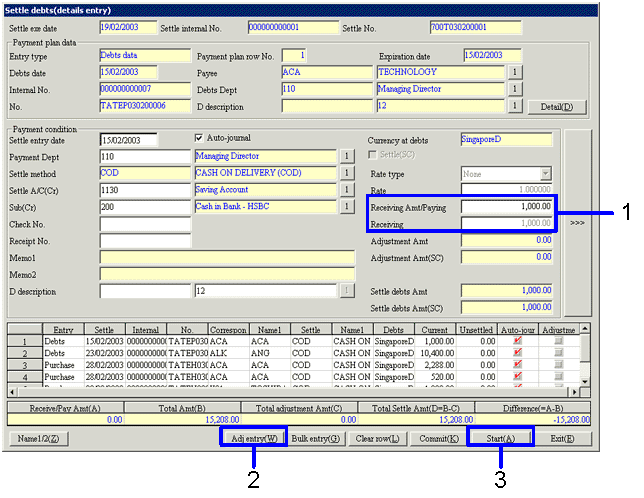
 4. Details entry screen
→To Menu Reference
- Confirm the receive/pay amount
- If you wish to make an adjustment of the transfer commission, for example, click on "Adjustment entry (W)" button.
→ The "Settling adjustment entry" screen appears.
- Once you have confirmed the receive/pay amount and made any adjustments to the amounts, click on "Start (A)" button.
→ The selected data is settled, and auto-journal will be carried out for it to be reflected in the account.
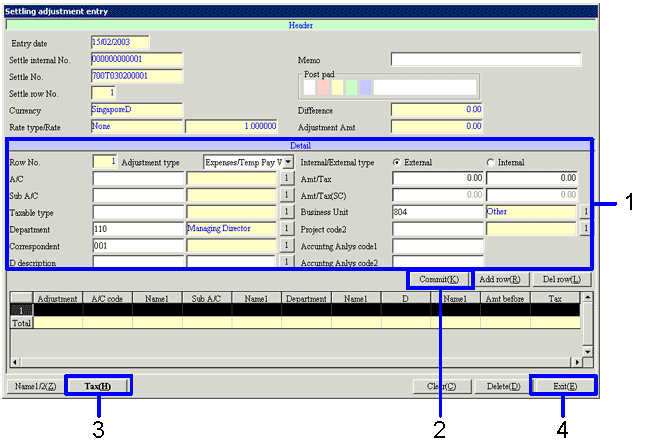
 5. Adjustment entry screen
→To Menu Reference
- Input the journal and the amount.
- Click on "Commit (K)" button.
Input data is displayed in the [Spreadsheet] (bottom of screen).
- Do not forget to click on "Tax (H)" button.
- Click on "Exit (E)" button.
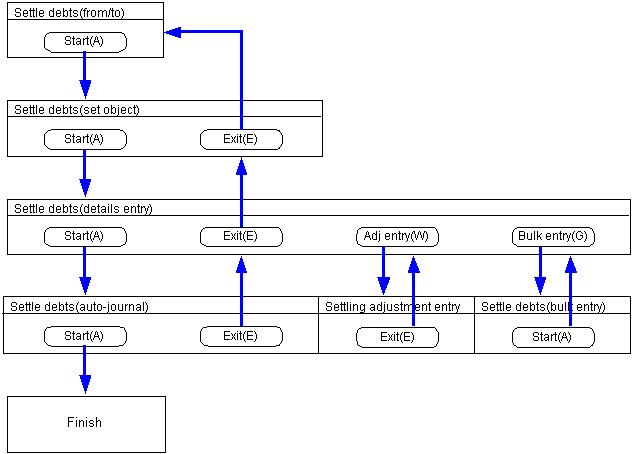
 Screen transition for settle claims
Here is a diagram of the settle claims screen transition.
![]() Procedure for settle debts
Procedure for settle debts![]() Functions outline
Functions outline![]() 1. Screen display method
1. Screen display method![]() 2. Searching conditions entry
2. Searching conditions entry
![]() 3. Procedure for specifying settle object
3. Procedure for specifying settle object
![]() 4. Details entry screen
4. Details entry screen
![]() 5. Adjustment entry screen
5. Adjustment entry screen
![]() Screen transition for settle claims
Screen transition for settle claims