 Procedure for purchase entry (Summary method)
 Outline
Select purchasing object data from among data already processed for arrival and process for purchasing.
 1. Screen display method
-
Select [Purchase Control] → [Purchase Control] → [Entry].
-
Select [Purchase Entry (Summary Method)] from menu options.
→ The [Purchase entry (Summary method)] screen is displayed.
 2. Searching conditions entry
→To Menu Reference
-
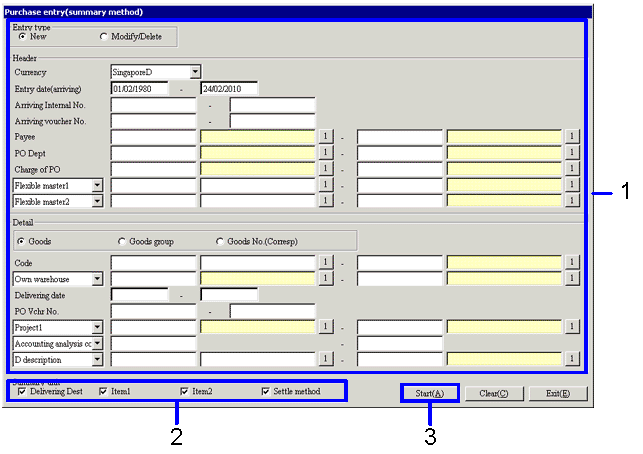
Enter the searching conditions for the purchase data.
Select "New" to specify data for which a new purchase is to be processed.
Select "Modify/Delete" to modify data for which a purchase has already been processed.
-
Select the summary unit. (Displayed only when the "New" option under entry type is selected.)
Searched data is sorted by specified unit and summarized as purchase vouchers.
-
Click the "Start (A)" button.
→ The [Purchase entry list] screen is displayed.
Only data already processed for arrival is included as objects of the search.
 3. Select purchase object
→To Menu Reference
-
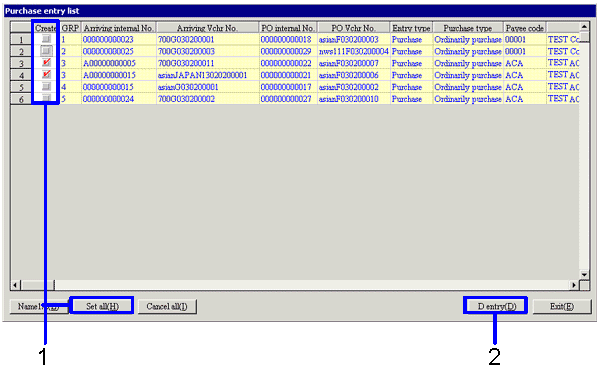
Activate the "Create" checkbox for the data used to create purchase data.
Click the "Set all (H)" button to activate the checkboxes for all data.
Note, however, that creating and processing bulk vouchers is only possible for data with identical GRP codes. When purchase vouchers are compiled, data with identical GRP codes will be processed on the same purchase voucher.
In the case that checkboxes for some data with the same GRP code are activated while other checkboxes are not, only data that has been activated will be contained on a single voucher.
-
Click on the "D entry (D)" button.
→ The [Purchase entry] screen is displayed.
 4. [Header] tab entry
→To Menu Reference
-
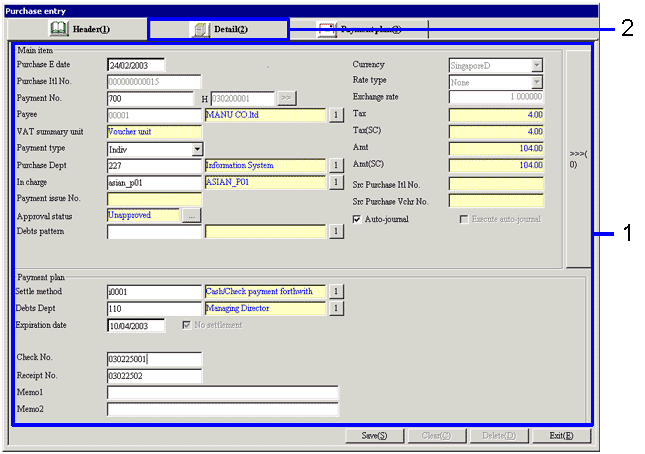
Verify purchase data.
Activate the "Auto-journal" checkbox to include data in auto journal processing.
Activate the "No settlement" checkbox to exclude data from settlement processing.
-
Click on the [Details] tab to verify [Details] data.
 5. [Details] tab entry
→To Menu Reference
-
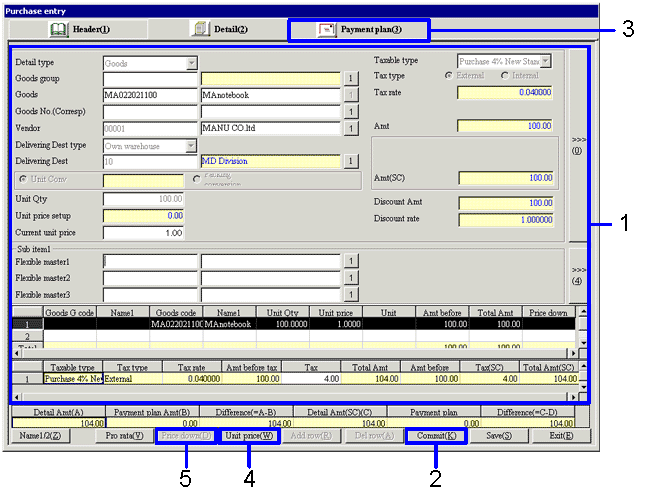
Verify purchase data. Verify "unit prices" and "discount rates" contained in individual detail rows.
-
Click on the "Commit (K)" button.
→ The detail row is recalculated.
-
Click on the [Payment plan] tab to verify [Payment plan] data.
-
Click on the "Unit price (W)" button to display the [Refer unit price history] screen. Use this screen to refer to past arriving and discount histories for targeted correspondents.
-
Clicking the "Price down (D)" button displays the [Price down/Appreciation] screen. Use this button to cut/appropriate price for all vouchers or individual goods, or to enter charges. You can also go to "Current unit price" under the [Detail] tab to cut/appropriate price for individual goods.
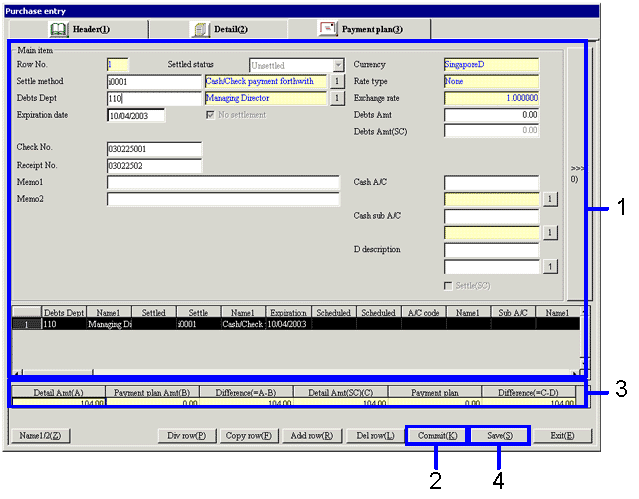
 6. [Payment plan] tab entry
→To Menu Reference
-
Verify purchase data.
Verify "debts entry amounts" contained in individual detail rows.
-
Click on the "Commit (K)" button.
→ The spreadsheet is recalculated.
-
Modify amounts so that the "Difference (=A-B)" and the "Difference (=C-D)" columns in the amount display spread both equal 0.00.
Data is not saved even after clicking on the "Save (S)" button if the "Difference" columns do not equal 0.00.
-
Click on the "Save (S)" button.
→ Purchase data is registered.
 7. Cancel voucher
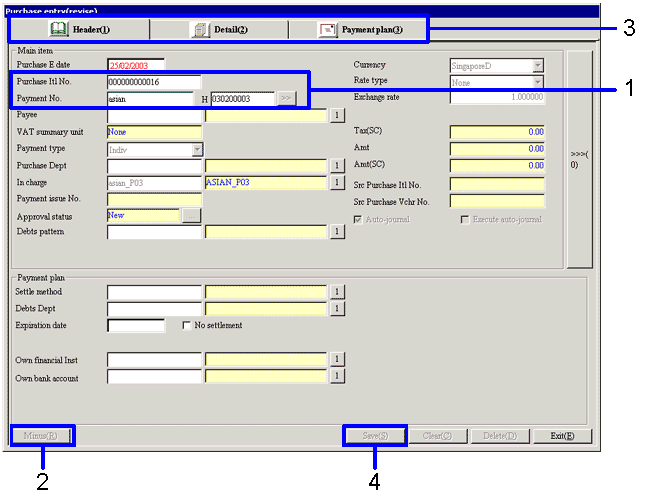
Entered (and saved) vouchers can be cancelled in the [Purchase entry (revise)] menu.
→To Menu Reference
- Display target voucher.
Specify voucher to be cancelled with "Internal No." or "Invoice No."
→ Specified voucher is displayed.
- Click on the "Minus (R)" button.
Amount is now displayed in negative values.
- Verify the data under the [Details] and [Payment plan] tabs and modify as necessary.
- Click on the "Save (S)" button.
![]() Procedure for purchase entry (Summary method)
Procedure for purchase entry (Summary method)![]() Outline
Outline![]() 1. Screen display method
1. Screen display method![]() 2. Searching conditions entry
2. Searching conditions entry
![]() 3. Select purchase object
3. Select purchase object
![]() 4. [Header] tab entry
4. [Header] tab entry
![]() 5. [Details] tab entry
5. [Details] tab entry
![]() 6. [Payment plan] tab entry
6. [Payment plan] tab entry
7. Cancel voucher
